
Assistance with Mr Taft's Godot Tutorials
Or rather, this is a repository for things that those of us in his Discord chat have found helpful, but that never actually appeared in the tutorials.
Quick topic jumping list:
- Stop Slimes Taking Over Other Obstacles
- Rocket Ship Row Destroy/Column Destroy Booster
- KC's Background Overflow Solution
- Resetting Levels Proper
- Reconnecting Booster Signals
- Don't Hint Sinkers
- Don't Shuffle Sinkers
- Hiding Ninja's Overflow Fix
- Background Grid
- Dialogue Boxes
- Obstacles as Goals
- Obstacles with more than 1 Health
- Finny's Sound & Music Buttons
- 3 Stars in goal bar and map
- More than 3 goals
- Vern's goal dropdown menu
- Add to Counter Booster
- Hammer Booster
- Row & Column Bomb Boosters
- Plus Sign Bomb Booster
- Adjacent Bomb Booster
- Bomb Interactions
- Sinker Targets
- #IsItRefactoringOrIsItMe
- Wish List
New as of 5/6/2020
Stop Slimes Taking Over Other Obstacles
Props to SoloCarryGuy for taking the time to code this one out. He realized what we probably all forgot - that slimes tend to take over ALL obstacles. To prevent that, he rigged up their function that checks for normal neighbors to also check if there was an obstacle at that location, and if so, avoid it.
func find_normal_neighbor(i,j):
    if is_in_grid(Vector2(i+1, j)):
        if all_pieces[i+1][j] != null and !is_a_sinker(i+1,j) and !restricted_move(Vector2(i+1, i)) and !restricted_fill(Vector2(i+1, i)):
            return Vector2(i+1,j);
    if is_in_grid(Vector2(i-1, j)):
        if all_pieces[i-1][j] != null and !is_a_sinker(i-1,j) and !restricted_move(Vector2(i-1,j)) and !restricted_fill(Vector2(i-1,j)):
            return Vector2(i-1,j);
    if is_in_grid(Vector2(i, j+1)):
        if all_pieces[i][j+1] != null and !is_a_sinker(i,j+1) and !restricted_move(Vector2(i,j+1)) and !restricted_fill(Vector2(i,j+1)):
            return Vector2(i,j+1);
    if is_in_grid(Vector2(i, j-1)):
        if all_pieces[i][j-1] != null and !is_a_sinker(i,j-1) and !restricted_move(Vector2(i,j-1)) and !restricted_fill(Vector2(i,j-1)):
            return Vector2(i,j-1);
    return null;
New as of 2/1/2020
Rocket Ship Destroy Column/Row Booster
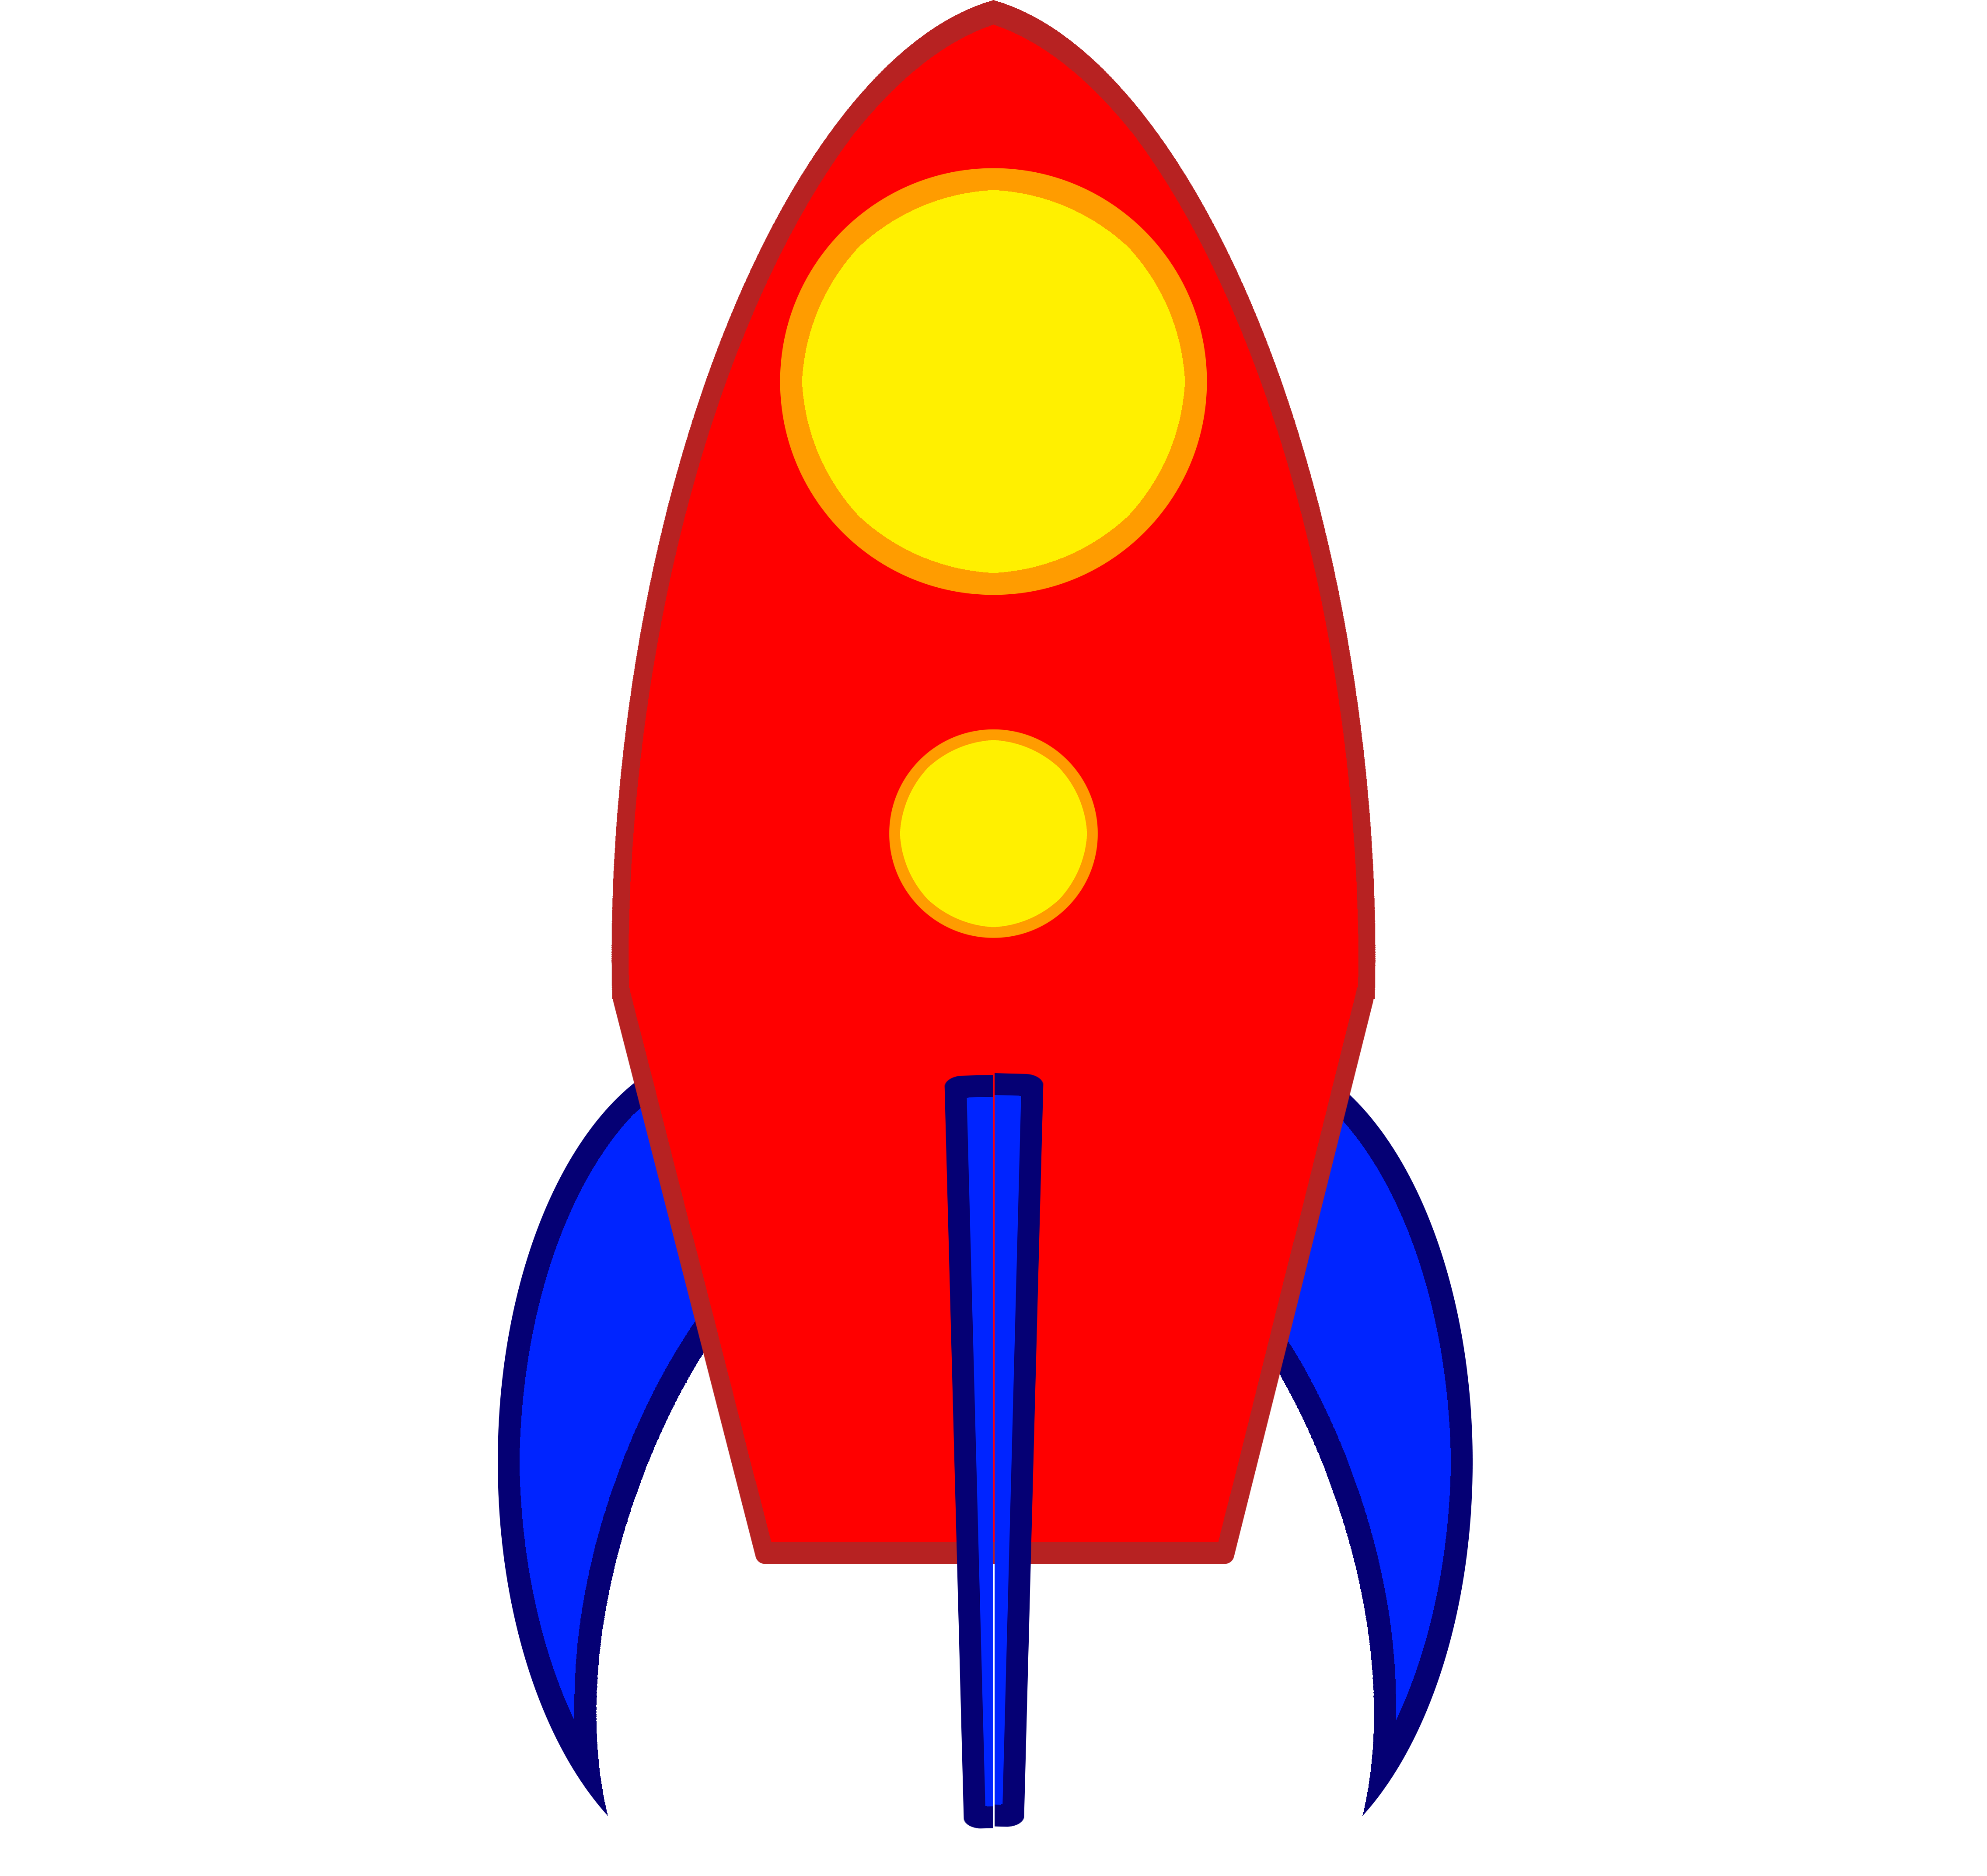
When you click on a booster to destroy a row or column, usually you want some little picture to appear on the screen and actually, you know, destroy the row or column.For this example, we're going to queue a little rocket ship to fly across the screen and destroy our column. You can substitute in whatever little picture you want, though.
Here's our example pic. Drop it in your art folder for now. (Sorry it's so big. We'll fix that in-game.)
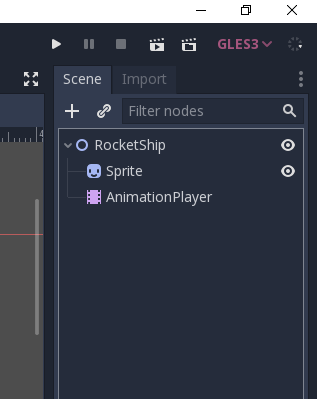
So to start, we need a new scene, type Node 2D. Name it RocketShip or something.
Then give it two children: a sprite and an animation player.
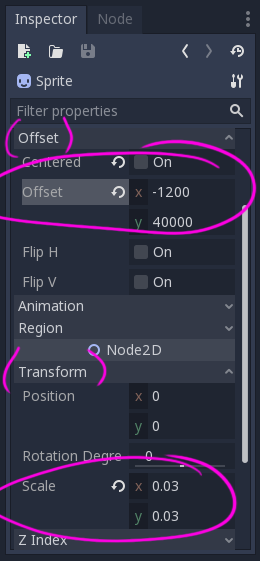
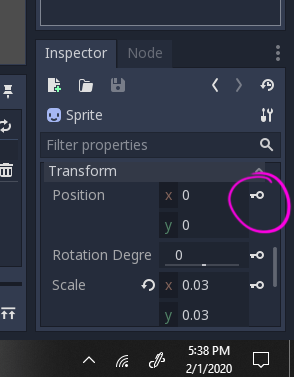
Give the Sprite the rocket ship texture. We'll have to resize the crud out of it. In the Inspector, open the Transform area, and set the Scale to .03 on both the X and Y. Then, a little above that, in the Offset, set the X to -1200 and the Y to 40000. (That's forty thousand. Just bear with me, it'll make sense once you see it.)
See how the ship is now proper sized and down at the bottom of the window, offscreen? That's where it's going to sit and hide while not in use. (Kind of like our pause screen hides offscreen.)
Next up, we need to set our animation player to do some tricks. Click it open.
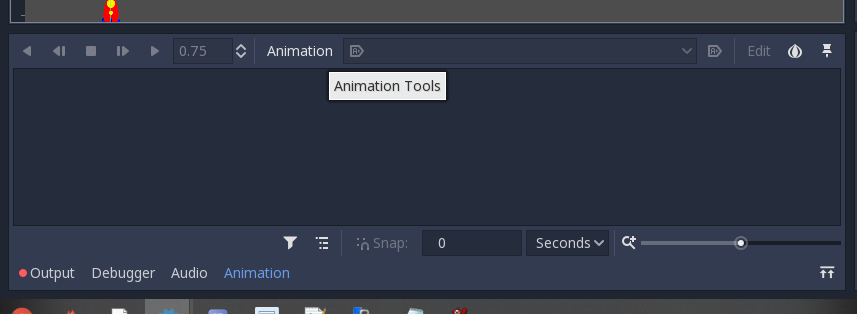
Remember this toolbar that pops up when ya use this thing? Next to the .75 in my screencap, click on the word "Animation". It will open a menu. Click "New" and then name it something like "Blastoff".
And over at the little stopwatch icon, we want to set the animation to .75. Also click on the blue Autoplay On Load icon (which is blue and circled in my screencap).
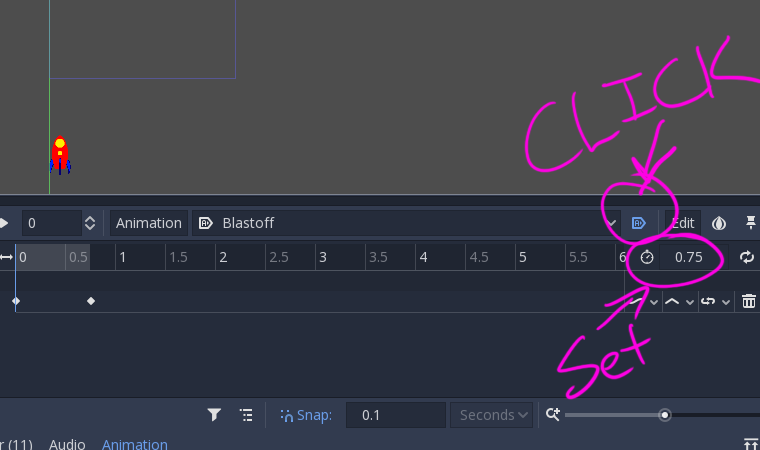
With that set up, click on your Sprite again. In the Inspector, scroll to Position. See the key next to it? Click that. It will ask if you want to make a new track, blahblahblah. Yes.
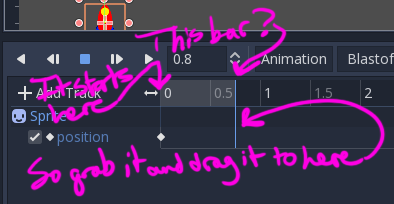
Now we've got our starting point set. We need to set the ending point. Click on the verticle blue line on the animation timeline and drag it to your end (.75).
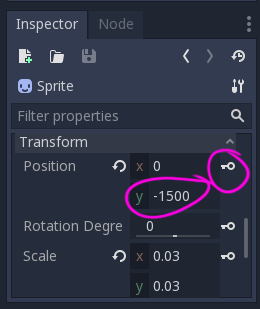
Good. Now go back over to the Inspector for the Sprite. Transform, Position, set the Y position to something like -1500 so it's ending way up above the screen. Then click the little key next to it to make that the final key for the animation.
Drag the little animation scrub bar back to 0 and hit play. You should witness your little rocketship example blast off from the bottom of the screen to the top. Good job! That's a lot less stress to worry about.
I guess we should save this thing... Scene -> Save Scene As -> (open the Scenes folder) -> name it something like RocketShipUp.tscn
Alight, that's as done as it needs to be for now... Next let's open the bottom_ui scene.
In the script for your HBox Container, set booster 1 and 2 to "Destroy Column" and "Destroy Row", because we're going to be making them work in a minute anyway.
Next we need to update the script for Booster1. I think since they all pull from the same script, if you just update it at 1 and then save, it will update the script for all of them.
Anyway, open your Booster1's script. You want to add these exports. (destroy_row_texture and destroy_column_texture)

Further down, in the func check_active, add these lines:

(Remember a minute ago we set the active boosters to things that didn't exist yet? Now the game will know what to do with that info - draw the new exports.)
Now about those exports. Here, put these in place. But you're going to have to do them for each Booster. I know the script updates all three, but their exports are still set individually.


Save and save often.
Close that scene and go back to your game_window scene.
Open the GameManager script.
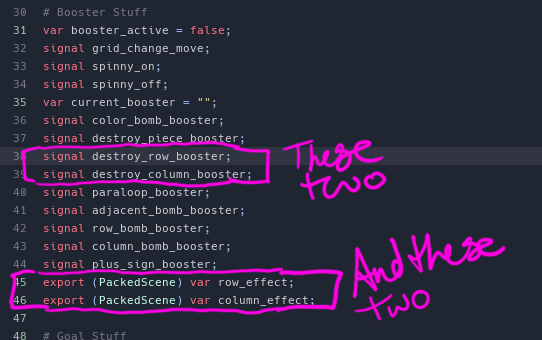
In the script's top area (why do we not call this header?) there's a section Taft called # Booster Stuff. We need to add two signals and two exports there.
Back out to 2D mode for just a moment, and click on your GameManager again, so you can see the exports in the Inspector. We didn't actually make the row thingy in this tutorial, but you made the column animation scene, so you must be a smart person. I'm sure you can figure out the row one on your own. From your FileSystem menu, drag and drop those scenes into the GameManager's exports.
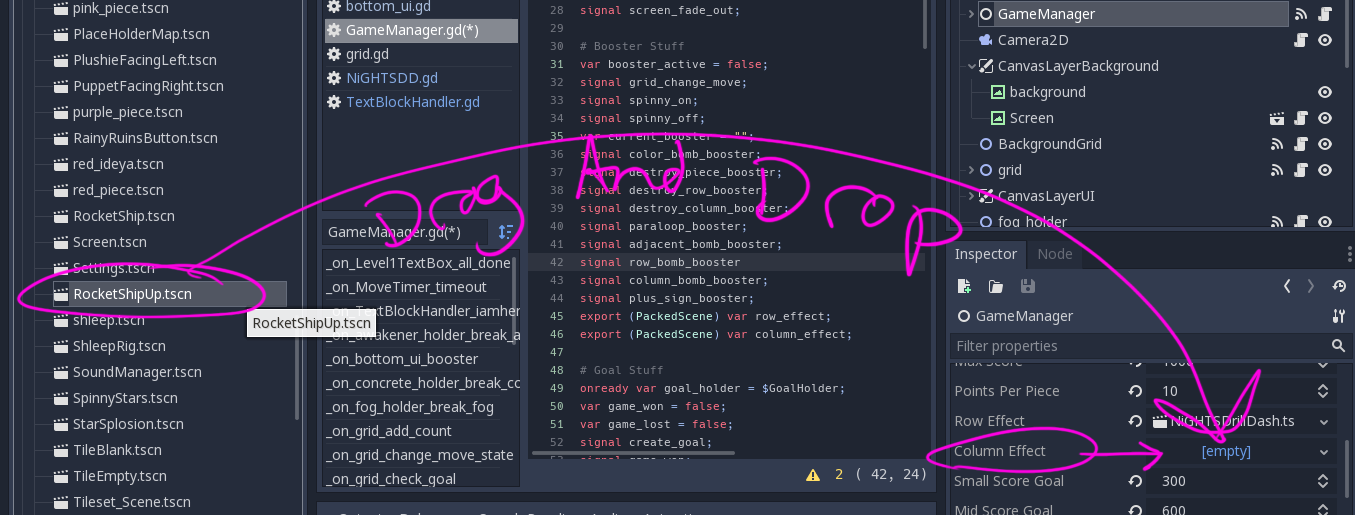
Back to the GameManager's script.
Aw geezy creezy, we got a lot of backwork I have to unspaghetti to figure out how to explain this...
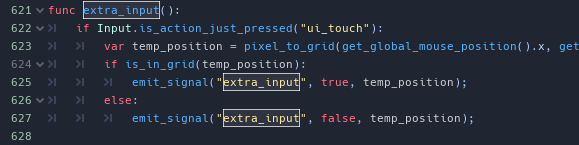
Head to your grid. Do a search (Ctrl F in Windows) for extra_input. Locate the func extra_input. See where it has True and False in red? We need to add a temporary position to it. Make it so.
Go back over to your GameManager's script. Locate the func _on_grid_extra_input. We need to update that with a temp position, too. (This is why I should write these things right when I'm working on them the first time, instead of trying to reverse engineer things and remember what got added where. Taft's got the right idea with doing everything live.)
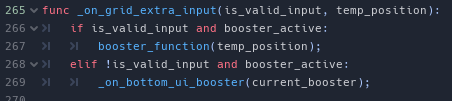
Alright, so now that signal is sending a location for us to use for the rocket ship.
Scroll up in GameManager's script to your func booster_function and make it now take the temporary position. Also add in a few new else ifs.
Okay, let's take care of those effects first since we'll still be in the GameManager.
Scroll down below that function and make some "New little helper functions". (Did you read that in Taft's voice?)
func create_row_booster_effect(temp_position):
	var temp = row_effect.instance()
	add_child(temp)
	temp.position = Vector2(0, 800 - 64 * temp_position.y)

func create_column_booster_effect(temp_position):
	var temp = column_effect.instance()
	add_child(temp)
	temp.position = Vector2(temp_position.x * 64 + 32, 0)
(This code is from Taftycat, so don't get mad at me if they don't work for you. They worked for me. Magic numbers, ftw.)
Okay, that concludes our work in the GameManager. Mostly. We need to connect those new signals. Click the GameManager so it brings up the Node area, and look for your new signals. We need to connect them to the grid.
Head over to the grid's script, to the bottom, where those new things should have appeared. Make them look like this.
I THINK that concludes everything we need to make these work. You should be able to test your game now and have functioning row destroy and column destroy boosters. (For the row one, you'll want to hit up the Transform option of your sprite and rotate it probably 90 degrees.)
If it turns out I've missed something, hit up the Godot Match 3 channel of Mister Taft's Discord server and let me know. See ya there.
KingCobra's Background Overflow Solution
KC is very diligent about making sure our games look good in any size resolution that a phone, mobile device, or computer might have. To that end, he has given us a way to make sure there will always be some kind of background visible, whether the device is held vertical, or horizontal. (Portrait, or Landscape.)(I'm not going to actually do this myself because I'm too lazy to attempt to make larger art for the backgrounds of every single level scene in my game. Maybe I'll go through later and add a generic background.)
These are his instructions:
under the CanvasLayer in the game_window I added a control node
under it I added a sprite
Then in the project settings --> display I set the stretch_mode to 2d and the stretch_aspect to ignore.
After that, back in the game_window, I toggled the current background to off,
and set the over-sized texture to the sprite (that's under the control node).
Then I added a script to the Control node and this is the codeextends Control onready var viewport = get_viewport() var minimum_size = Vector2(576, 1024) func _ready(): viewport.connect("size_changed", self, "window_resize") window_resize() func window_resize(): var current_size = OS.get_window_size() var scale_factor = minimum_size.y/current_size.y var new_size = Vector2(current_size.x*scale_factor, minimum_size.y) if new_size.y < minimum_size.y: scale_factor = minimum_size.y/new_size.y new_size = Vector2(new_size.x*scale_factor, minimum_size.y) if new_size.x < minimum_size.x: scale_factor = minimum_size.x/new_size.x new_size = Vector2(minimum_size.x, new_size.y*scale_factor) viewport.set_size_override(true, new_size)
Next I went to project settings, and added that code to AutoLoad.
BTW make sure that in the sprite in the offset, the "Centered" is on.
After that I pressed on botton_ui and set the layout to center bottom, and the top_ui to center top. So that when the aspect ratio gets longer the top and bottom_ui stay at the top and bottom.
One thing that I missed I did manually set the position of the spirte to the center of the "game area." I just dragged it.
One bug I've already found. I don't know if I did something wrong, but when you expand the window to the right it works, when you expand it to the left it doesn't work properly, I'll look at it and try to fix it. That was an easy fix (I think this fixes it). Press on the control node and set the layout to center. That should fix the problem
One problem that you might run into is that if you expand too much to the sides the pause and game_win screens get in the way, but I think all you'll have to do is set them farther from the game_window in the animation player. (You'll have to make the pause/game over animation a bit away from the game_window, because on a 16:9 display they get into the main screen a bit.)
New as of 10/27/19
Resetting Levels Proper
So giakaama pointed out that if you play several levels, then go back and RE-play one of the earliest ones, it will reset the stars and score of the level directly following it. (I had forgotten this was a problem, to be honest - so props to giakaama.)The problem arises from the GameManager script, so head there. Find the check_game_win function. Then find the line toward the bottom that says GameDataManager.level_info[level + 1].
The issue is that every time you beat a level, it resets the very next level (level + 1) back to zero. The fix is simply to throw in a check.
		if !GameDataManager.level_info.has(level + 1):
			GameDataManager.level_info[level + 1] = {
				"unlocked": true,
				"high score": 0,
				"stars unlocked": 0
			};
Then that's it. You're good to go. If you wanna play around with setting additional if checks to see about updating the stars or updating the score, then let us know what you find in Mister Taft's godot Discord channel. Otherwise, enjoy that your levels no longer reset.
New as of 10/19/19
Reconnecting Booster Signals
Did your brain go to mush after the long vacation? You're not alone. If you watched "Refactoring: Boosters Continued", were then tasked with reconnecting all of your own boosters, and then looked at your code and went "Whaaaaa...?" we'll give you someIn your GameManager.gd, update some signals like so:
# Booster Stuff
var booster_active = false;
signal grid_change_move;
var current_booster = "";
signal color_bomb_booster;
signal destroy_piece_booster;
signal destroy_row_booster;
signal destroy_column_booster;
signal adjacent_bomb_booster;
signal row_bomb_booster
signal column_bomb_booster
signal plus_sign_booster
(Obviously, don't add ones you don't need. This is just me trying to cover all of the bases for testing purposes. Or add them anyway, and just don't use them now - in case you want them later.)
We're pretty much adding signals to tell the Game Manager to tell the grid to do what it USED to do anyway. (idkwtfbbq) Greater minds than me, I suppose. We'll go with it.
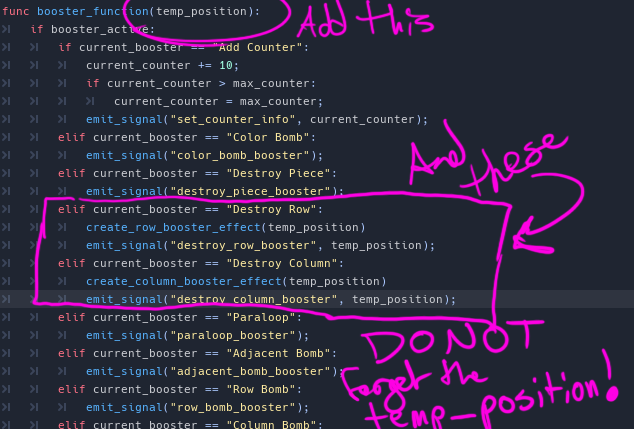
Then, same script, but down towards the bottom, in the func booster_function, we need to update it to look like this:
func booster_function():
	if booster_active:
		if current_booster == "Add Counter":
			current_counter += 10;
			if current_counter > max_counter:
				current_counter = max_counter;
			emit_signal("set_counter_info", current_counter);
		elif current_booster == "Color Bomb":
			emit_signal("color_bomb_booster");
		elif current_booster == "Destroy Piece":
			emit_signal("destroy_piece_booster");
		elif current_booster == "Destroy Row":
			emit_signal("destroy_row_booster");
		elif current_booster == "Destroy Column":
			emit_signal("destroy_column_booster");
		elif current_booster == "Adjacent Bomb":
			emit_signal("adjacent_bomb_booster");
		elif current_booster == "Row Bomb":
			emit_signal("row_bomb_booster");
		elif current_booster == "Column Bomb":
			emit_signal("column_bomb_booster");
		elif current_booster == "Plus Sign Bomb":
			emit_signal("plus_sign_booster");
		_on_bottom_ui_booster(current_booster);
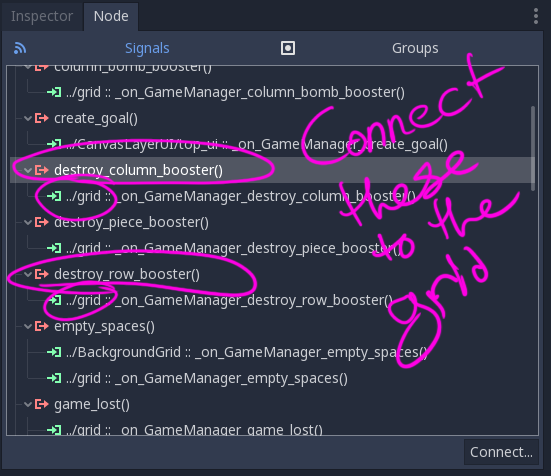
Prepare for tediousness... Now you've got to connect all of those new signals over to the grid. Go do that.
Once you've got all those connected, head back over to your grid script. You should have a whole ton of new functions at the bottom. Use your find ability to locate func booster_input(). We're going to be copying all of those conditions over to the new signal functions at the bottom of the page.
Should look like this when you're done:
func _on_GameManager_color_bomb_booster():
make_color_bomb(pixel_to_grid(get_global_mouse_position().x, get_global_mouse_position().y));
func _on_GameManager_destroy_piece_booster():
make_destroy_piece(pixel_to_grid(get_global_mouse_position().x, get_global_mouse_position().y));
func _on_GameManager_adjacent_bomb_booster():
make_adjacent_bomb(pixel_to_grid(get_global_mouse_position().x, get_global_mouse_position().y));
func _on_GameManager_column_bomb_booster():
make_column_bomb(pixel_to_grid(get_global_mouse_position().x, get_global_mouse_position().y));
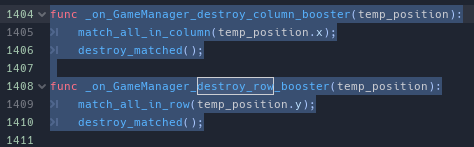
func _on_GameManager_destroy_column_booster():
match_all_in_column(pixel_to_grid(get_global_mouse_position().x, get_global_mouse_position().y));
func _on_GameManager_destroy_row_booster():
match_all_in_row(pixel_to_grid(get_global_mouse_position().x, get_global_mouse_position().y));
func _on_GameManager_plus_sign_booster():
make_plus_bomb(pixel_to_grid(get_global_mouse_position().x, get_global_mouse_position().y));
func _on_GameManager_row_bomb_booster():
make_row_bomb(pixel_to_grid(get_global_mouse_position().x, get_global_mouse_position().y));
Hit up your bottom_ui scene, your hbox container's script, change up what boosters you've got programmed in and test everything out. (Remember capitalization and spaces are sensative. If you followed the tutorial, you should be getting a print statement in your output for each booster you press. If you're not, there's a capitalization error or a space error somewhere.)
New as of 10/2/19
Don't Hint Sinkers
King Cobra found an issue where the hints were activating on sinkers, even though they ought not to be able to make matches.To fix it, we need to add a and !is_piece_collectible(i,j) to the checks in the find_all_matches method.
func find_all_matches():
	var hint_holder = [];
	clone_array = copy_array(all_pieces);
	for i in width:
		for j in height:
			if clone_array[i][j] != null and !restricted_move(Vector2(i, j)) and !is_piece_collectible(i,j):
				if switch_and_check(Vector2(i, j), Vector2(1, 0), clone_array) and is_in_grid(Vector2(i + 1, j)) and !restricted_move(Vector2(i + 1,j)):
					#add the piece i, j to the hint_holder
					if match_color != "":
						if match_color == clone_array[i][j].color:
							if !restricted_move(Vector2(i, j)):
								hint_holder.append(clone_array[i][j]);
						else:
							if !restricted_move(Vector2(i, j)):
								hint_holder.append(clone_array[i + 1][j]);
				if switch_and_check(Vector2(i, j), Vector2(0, 1), clone_array) and is_in_grid(Vector2(i, j + 1)) and !restricted_move(Vector2(i, j + 1)):
					#add the piece i, j to the hint_holder
					if match_color != "":
						if match_color == clone_array[i][j].color:
							if !restricted_move(Vector2(i, j)):
								hint_holder.append(clone_array[i][j]);
						else:
							if !restricted_move(Vector2(i, j)):
								hint_holder.append(clone_array[i][j + 1]);
	return hint_holder;
Don't Shuffle Sinkers
KC also found an issue where the sinkers were shuffling during gridlocked boards. I've yet to see a game where the sinkers also shuffle, so the correction here is also to add a check for !is_piece_collectible(i,j).
func shuffle_board():
	var holder_array = clear_and_store_board();
	for i in width:
		for j in height:
			if !restricted_fill(Vector2(i, j)) and all_pieces[i][j] == null and !is_piece_collectible(i,j):
				# choose a random number and store it
				var rand = floor(rand_range(0, holder_array.size()));
				var piece = holder_array[rand];
				var loops = 0;
				while(match_at(i, j, piece.color) && loops < 100):
					rand = floor(rand_range(0, holder_array.size()));
					loops += 1;
					piece = holder_array[rand];
				# Instance that piece from the array
				piece.move(grid_to_pixel(i, j));
				all_pieces[i][j] = piece;
				holder_array.remove(rand);
	if is_deadlocked():
		shuffle_board();
	can_move = true;
	emit_signal("change_move_state");
New as of 9/19/19
Hiding Ninja's Overflow Fix
Chances are, if you're far enough into this project to be looking at this page, you've encountered the dreaded "socket error" at least once. Multiple things can cause them, not any one specific thing, so it's important to have a second set of eyes look over your work.
Having said that, Hiding Ninja found an overflow problem that never gets addressed in the tutorials. He found that "you need to check if a match was made when a bomb explodes, and then immediately set matched to true"
Correction as follows:
func match_all_in_column(column):
	for i in height:
		if all_pieces[column][i] != null and !is_piece_collectible(column, i):
			if !all_pieces[column][i].matched:
				all_pieces[column][i].matched = true;
				if all_pieces[column][i].is_row_bomb:
					match_all_in_row(i);
				if all_pieces[column][i].is_adjacent_bomb:
					find_adjacent_pieces(column, i)
				if all_pieces[column][i].is_color_bomb:
					match_color(all_pieces[column][i].color);
				all_pieces[column][i].matched = true;

func match_all_in_row(row):
	for i in width:
		if all_pieces[i][row] != null and !is_piece_collectible(i, row):
			if !all_pieces[i][row].matched:
				all_pieces[i][row].matched = true;
				if all_pieces[i][row].is_column_bomb:
					match_all_in_column(i);
				if all_pieces[i][row].is_adjacent_bomb:
					find_adjacent_pieces(i, row);
				if all_pieces[i][row].is_color_bomb:
					match_color(all_pieces[i][row].color);
				all_pieces[i][row].matched = true;

func find_adjacent_pieces(column, row):
	for i in range(-1, 2):
		for j in range(-1, 2):
			if is_in_grid(Vector2(column + i, row + j)):
				if all_pieces[column + i][row + j] != null and !is_piece_collectible(column + i, row + j):
					if !all_pieces[i][j].matched:
						all_pieces[column+i][row+j].matched = true;
						if all_pieces[column + i][row + j].is_row_bomb and !is_piece_collectible(column + i, row + j):
							match_all_in_row(j);
						if all_pieces[column + i][row + j].is_column_bomb and !is_piece_collectible(column + i, row + j):
							match_all_in_column(i);
						if all_pieces[column + i][row + j].is_color_bomb:
							match_color(all_pieces[column + i][row + j]);
						all_pieces[column + i][row + j].matched = true;
New as of 8/28/2019
Background Grid
I'm totally fine with the pieces in my grid NOT having a background, because I have coolio backgrounds in mind for my game. At the same time, I can understand how you might want a "game board" for your pieces to sit on. So let's go.
Assuming you've kept up with Taft's tutorials, your GameManager should now handle the height and width of your board. We're going to move the empty spaces there as well. Open your GameManager's script. Up top, in # Board Variables, add this stuff:
export (PoolVector2Array) var empty_spaces;
signal empty_spaces
Further down, in the func setup() , under emit_signal("set_dimensions"), add this chunk:
	if empty_spaces != null:
		emit_signal("empty_spaces", empty_spaces);
Basically, that says "Check if the empty spaces export is empty. If there's something typed in (therefore, there ARE empty spaces), then emit this signal."
In your grid script, don't remove the export for empty_spaces just yet. Reason being is that while we ARE setting them in the GameManager, we still want the grid to know how to handle them. So when the grid receives the signal about them, it'll just overwrite the info it had (which was nothing).
(Still in grid's script.) You should still have stuff for empty_spaces in your func restricted_fill. Leave that there.
Now, all the way down the bottom, add this little bit, for when we connect signals.
func _on_GameManager_empty_spaces(new_empty_spaces):
	empty_spaces = new_empty_spaces;
That tells the grid what to do with the empty space info it receives from the GameManager.
Gonna jump around a little bit here... With your main "game_window" node selected, add another child node 2d. Name it BackgroundGrid or something and put it right above the grid. Give it a script.
And now, because I love you, I'm going to give you a link. If I copy-pasted the script for that node onto this page, it would be miles long. So just... Go to this one instead.
That's the BackgroundGrid's script, all functional and nice. You're welcome.
Click on your GameManager again. Node. (So you can see signals.) Connect empty_spaces() to both the grid and the BackgroundGrid. We already wrote their receiving code, so you should be all s- OH WAIT!
Sorry, I forgot, you need two new scenes. According to our script, they'll be called TileBlank.tscn and TileEmpty.tscn .
Open a new scene, type node2d. Name it TileBlank. (This will be the graphic that goes behind your pieces. Replace with whatever you want after you've done it once and seen how it works.
Give it a child node sprite.
Give the main node a script. Since it's only 50-some lines, I'll paste it here for ya.
extends Node2D

#filled background spots
export (Texture) var middle_or_side_texture;
export (Texture) var top_left_texture;
export (Texture) var bottom_left_texture;
export (Texture) var top_right_texture;
export (Texture) var bottom_right_texture;
export (Texture) var island_texture;
export (Texture) var top_peninsula_texture;
export (Texture) var bottom_peninsula_texture;
export (Texture) var left_peninsula_texture;
export (Texture) var right_peninsula_texture;

# Called when the node enters the scene tree for the first time.
func _ready():
	pass # Replace with function body.

func make_middle_or_side():
	$Sprite.texture = middle_or_side_texture;

func make_top_left():
	$Sprite.texture = top_left_texture;

func make_bottom_left():
	$Sprite.texture = bottom_left_texture;

func make_top_right():
	$Sprite.texture = top_right_texture;
	$Sprite.modulate = Color(1, 1, 1, 1);

func make_bottom_right():
	$Sprite.texture = bottom_right_texture;
	$Sprite.modulate = Color(1, 1, 1, 1);

func make_island():
	$Sprite.texture = island_texture;

func make_top_peninsula():
	$Sprite.texture = top_peninsula_texture;

func make_bottom_peninsula():
	$Sprite.texture = bottom_peninsula_texture;

func make_left_peninsula():
	$Sprite.texture = left_peninsula_texture;

func make_right_peninsula():
	$Sprite.texture = right_peninsula_texture;
That should give you a bunch of exports for different sprites. Here's the sprites themselves:
Download the zip of art, here.
Put them in the appropriate places according to their names. I used the side_or_middle_piece as the default sprite art. Save. Close.
New new scene. Type node2d. Name it TileEmpty. (This will be art for the ACTUAL empty spaces, so it looks nice and neat.) Give it a script. Add a child sprite.
Here's the script:
extends Node2D

#empty background spots
export (Texture) var all_empty;
export (Texture) var ne_corner;
export (Texture) var nw_corner;
export (Texture) var sw_corner;
export (Texture) var se_corner;
export (Texture) var ne_nw_corner;
export (Texture) var nw_sw_corner;
export (Texture) var sw_se_corner;
export (Texture) var se_ne_corner;
export (Texture) var ne_sw_corner;
export (Texture) var nw_se_corner;
export (Texture) var ne_nw_sw_corner;
export (Texture) var nw_sw_se_corner;
export (Texture) var sw_se_ne_corner
export (Texture) var se_ne_nw_corner;
export (Texture) var all_corners;

# Called when the node enters the scene tree for the first time.
func _ready():
	pass # Replace with function body.

func make_empty():
	$Sprite.texture = all_empty;

func make_ne():
	$Sprite.texture = ne_corner;

func make_nw():
	$Sprite.texture = nw_corner;

func make_sw():
	$Sprite.texture = sw_corner;

func make_se():
	$Sprite.texture = se_corner;

func make_ne_nw():
	$Sprite.texture = ne_nw_corner;

func make_nw_sw():
	$Sprite.texture = nw_sw_corner;

func make_sw_se():
	$Sprite.texture = sw_se_corner;

func make_se_ne():
	$Sprite.texture = se_ne_corner;

func make_ne_sw():
	$Sprite.texture = ne_sw_corner;

func make_nw_se():
	$Sprite.texture = nw_se_corner;

func make_ne_nw_sw():
	$Sprite.texture = ne_nw_sw_corner;

func make_nw_sw_se():
	$Sprite.texture = nw_sw_se_corner;

func make_sw_se_ne():
	$Sprite.texture = sw_se_ne_corner;

func make_se_ne_nw():
	$Sprite.texture = se_ne_nw_corner;

func make_all_corners():
	$Sprite.texture = all_corners;
Again, load images according to their names. I used the "test" pieces as the default sprite art. (That way if something messes up, I know it because it's a different color.)
Save. Close.
Go back to your main game scene and its GameManager. Add some empty spaces. Enjoy my hours and hours of work. Again, you're welcome.
New as of 8/10/2019
Dialogue Boxes
I realize not everyone will need this, but if you want it, it's here for putting tutorials in place for your game.
To start, we need some characters to converse in our tutorial. (Or one, if you wanna be REALLY like CandyCrush and just have one character talk to the player.)
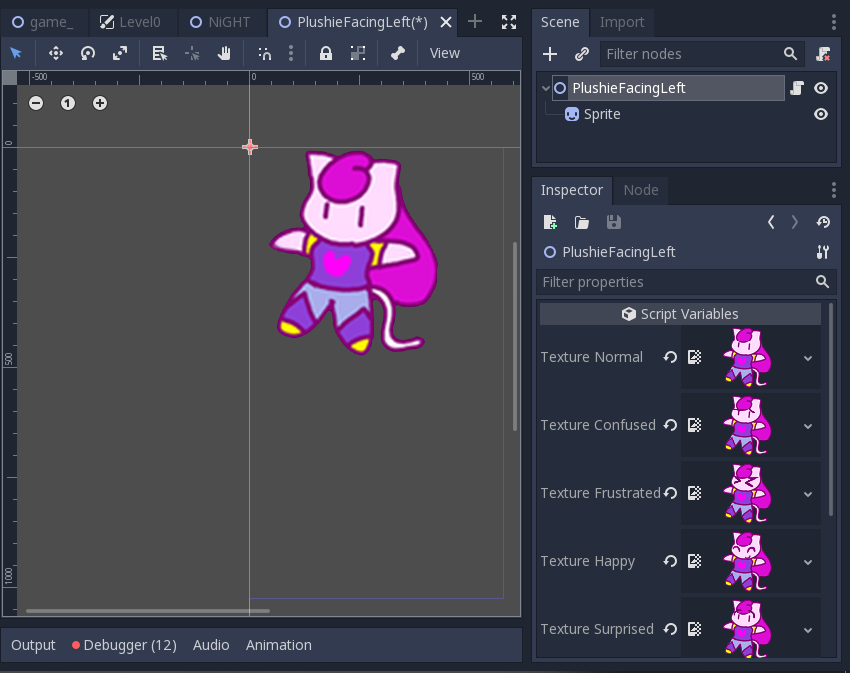
Open a new scene, type Node2D. Name the Node2D something so you'll remember what this scene is. Add a sprite. Give the sprite a texture. I find it most helpful to click on the sprite setting called Offset in the Inspector, and turn off "Centered", so my sprites are in the proper place for me.

Then go back to your node2d and give it a script. Probably best to name it the same thing (or similar) to your scene's name. Put it in the script folder, like ya dooo~.
Now this next part you need to customize. I'm going to give you guys a sample, but change up the textures and their names to match what you need.
extends Node2D

export (Texture) var texture_normal;
export (Texture) var texture_confused;
export (Texture) var texture_frustrated;
export (Texture) var texture_happy;
export (Texture) var texture_surprised;

func _ready():
	pass # Replace with function body.

func texture_normal():
	$Sprite.texture = texture_normal;

func texture_confused():
	$Sprite.texture = texture_confused;

func texture_frustrated():
	$Sprite.texture = texture_frustrated;

func texture_happy():
	$Sprite.texture = texture_happy;

func texture_surprised():
	$Sprite.texture = texture_surprised;
Obviously if you don't need all of those, don't use them all. You can have just one texture if you want and use a sprite WITHOUT a parent node2d, but if you want more than one expression or pose, I suggest you do it this way - because it works. (If you're a coding professional, then the chances are you're not looking HERE for advice on how to do this and can do it however you want.)
Back out and start adding some art to your textures, which will now be in the Inspector for your node2D.
Save. This one's done. Make another using the same method if you want someone for your character to talk to.
Next, you need a scene for them to interact on. We'll be inserting into a level shortly, but not yet.
For this one, I named my scene LevelOneTextBox but you're free to name it whatever you want.
If you find later that you want one for level 3 to introduce a particular obstacle, then in your FileSystem window (on the left in all Taft's old videos), right click this scene and duplicate it, but name it something else. KEEP IN MIND that if you do this, you'll need to rename the new scene's node2d so you don't get confused, and also go to its Inspector, to the Script area, click the script's drop down/up menu, and choose "make unique", or else you'll accidentally edit ALL scenes that use the same script!
So new scene, type CanvasLayer. We're going to add a bunch of stuff and it won't all make sense first. Just go with it.
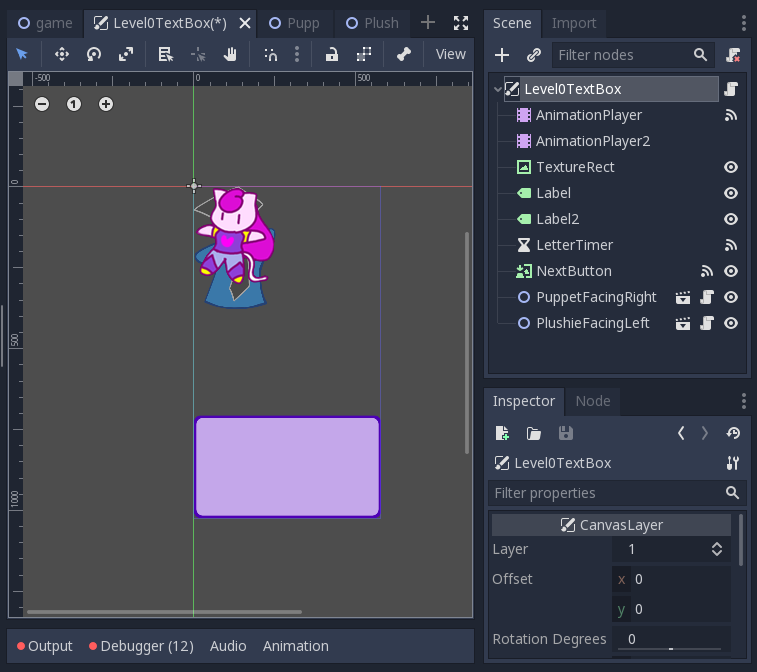
Add: two animation players, a texture rect, two labels, a timer, a texture button, and then instance in the character(s) scene(s) you just made.
Should look like this (minus the signals and the art for the box - because we didn't get there yet):
Okay, now to start building this up, you need the actual text box... I'll give you a sample one, but by all means - make your own.

I know that's a lot of clear area, but it's because the image's complete sizes matches Taft's background image size completely. It made it so I didn't have to fuss with where on the screen it appeared. If you wanna play with margin containers and a text box that doesn't involve a huge clear background, be my guest.
That image gets loaded onto the TextureRect in our Scene tree. So there should be 2 or 3 things visible - the text box, and your character or characters.
Next up, position your character(s) where you'll want them when they're onscreen talking. Just use the MoveMode button from the top tool bar to drag and place them for now.
Once you've got them pretty good, go to the Inspector and scroll down to Transform. Take a look at the positions. Chances are that you've got some decimal positions. Let's round those up real quick.
Now it's time to fuss with the animation players. Let's start with the first one, simply named AnimationPlayer. This one will control how your text box box appears on screen. For purposes of this, we'll make it fade in. So... Assuming all y'all are in Godot 3.something, click on the spot that says Animation.
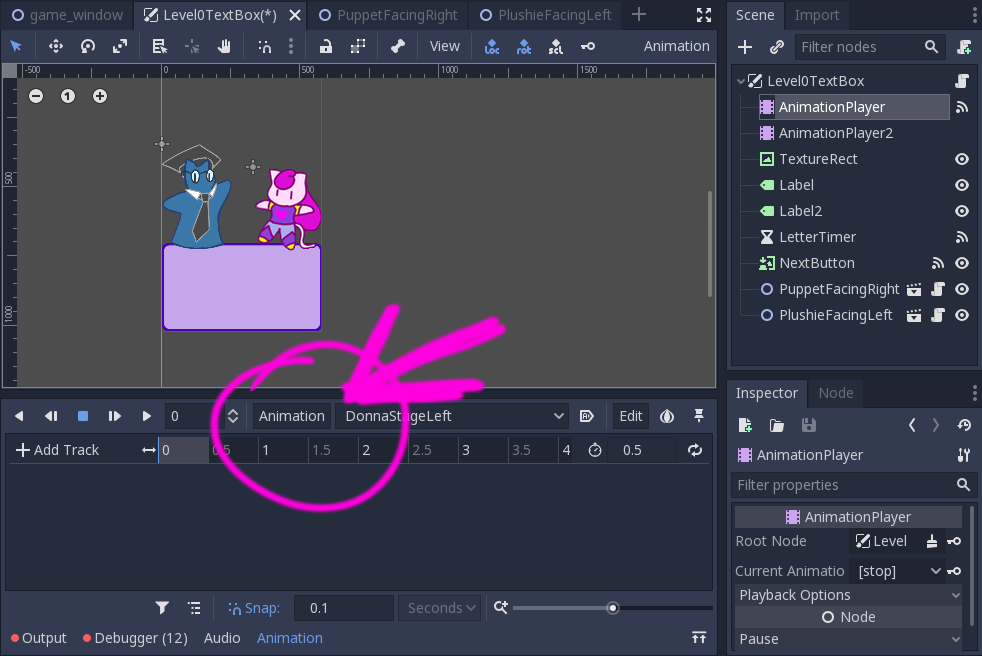
It'll pop up a menu, so hit New at the top of the list. Name it something like TextBoxAppear. Over on the right, next to the stopwatch icon, set how long you want the animation to take. (I picked 2 seconds.)
Click on your TextureRect (which should be your text box shape), and in the Inspector, scroll down to Visibility. Once you've dropped down its options, click on the big white block next to the word Modulate. (Remember this?)
There should be four channels listed: Red, Green, Blue, and Alpha. Alpha controls the see-through-ness. Change that to zero.
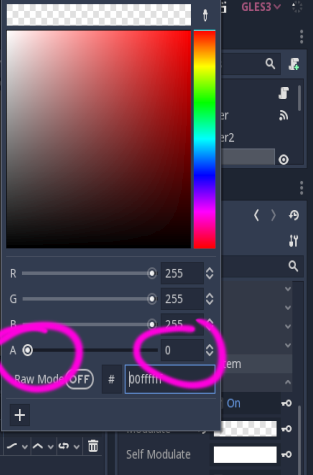
Then click on the key icon next to the (now clear) modulate box. You'll get a popup box asking you to confirm you want to create a new track for property 'modulate'. Just click "create".
Remember how Taft taught us to "scrub" the animation timeline forward? Grab the blue vertical line that's at 0 on your timeline and drag it to the end (for me, that's 2 seconds).
Click on the modulate box again and change the Alpha channel back to 255. Make another key (so for me it appears at the 2 second mark on the timeline).
Should look like this:

All good? Okay. Next is the second animation player, which is called AnimationPlayer2 for me. (These names are important for when we get to scripting the scene.)
Same deal. Click "Animation", "New", name it something relevant, like, "CharacterEnterStageRight" or something. Next to the stopwatch icon, set how long the animation will take. (I'm using .5 seconds.)
Whichever character this one is moving, click on them. Go to their position again. If your animation timeline's blue verticle bar is still at the end of your timeline (for me, it's at .5 seconds), then you're fine. Click the key next to the "position" property for your character. This will set their final position.
Granted, this is working slightly backwards, but now we want to scrub the blue line on the animation timeline back to the beginning. Then, on your character's X position coordinate, start messing with numbers. If you want the character to move off screen right, increase, if off stage left, go negative.
Make a new key at the off-screen position, for the 0 second spot on the timeline.
I don't wanna overload you guys with screen caps. Just hit play and make sure your animation works.
Repeat the process if you've got more than one character.
Save and save often.
Down the bottom where it says Output, Debugger, Audio, Animation, click on Animation to collapse that tool section.
Now we need to mess with the labels. *sigh* The thing I hate most about labels is setting their font. If you've got a font saved that works for you, use it. Otherwise, backreference Taft's videos on getting functional fonts. Come back when you've got it.
Assuming you now have a functional font programmed (in both labels), we need to go to the Inspector for each one and turn on Autowrap. (It's a check box.) That'll make it so your text will automatically overflow onto the next line.
Then we've gotta fuss with margins. I hate margins. Make a container if you want, I just set them manually to look like this:
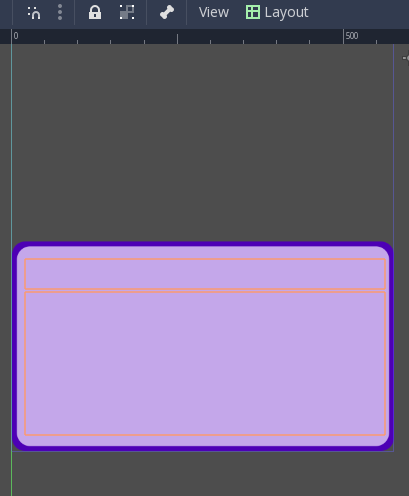
I know it's hard to see orange on pale purple - sorry.
The top label is for the name of your character. The bottom label is for their actual dialogue. If you're only using one character, you can skip having two and just have one if you want.
To save time, here's my margins, but if you didn't use my text box as a template, you'll need to adjust things.
Two more things, and then we can script.
For the timer, name it LetterTimer so you don't forget what it is. Then set its Wait Time to .1 seconds. (You can adjust this later if you want it faster or slower.)
And for your TextureButton, name it NextButton and give it a normal texture. I'll give you a template, but feel free to change it.

Use your move mode button on the godot top toolbar (or you can shortcut to it by just hitting your W key) to move the button where you'll want it placed in your text box's area.
I put mine here:
Alright! That's done!
Let's script!
On your main scene tree's canvas node (mine is called Level0TextBox, but yours might be different), give it a script. Name it something appropriate.
To start, select everything from line 2 down and delete it. We only need the extends from canvaslayer part.
Then, leave yourself a note in the script.
#Everytime you use this script, use "make unique"This time you don't need to make it unique, but you will every other time you use it so that you can change the dialogue words and not foul up every other time you used the same thing.
Next, we're adding our header code.
#Make as many of these as you need. Named whatever you want.
var one_done = false;
var two_true = false;
var three_free = false;
var four_more = false;
var five_alive = false;
var six_fixed = false;
var seven_given = false;
var eight_great = false;
var nine_fine = false;
var ten_then = false;

signal all_done;
As the comment says, you can name those variables whatever you want. You'll understand them better in a moment.
The signal at the end there is important for when we implement this scene with one of your levels.
Next is a temporary ready function. We'll remove this shortly.
func _ready():
	TextBoxAppear();
	set_01();
We'll get to what those functions are in a moment - I'm trying to go in order.
By default, your NextButton should be invisible, so we're hopping out of the script for just a moment to go to the button and change its Visisbility in the Inspector. Go to Modulate, and change the Alpha channel to 0.
Back to the script, we need a function to help the next button appear if it hasn't yet.
func _process(delta):
	if $Label2.visible_characters == $Label2.get_total_character_count():
		$NextButton.modulate = Color(1, 1, 1, 1);
For every frame, this function will check if all of the text for Label2 has shown up yet. If it has, it will turn the next button visible.
func _input(event):
	if Input.is_action_just_pressed("ui_touch"):
		if $Label2.visible_characters < $Label2.get_total_character_count():
			$Label.set_visible_characters($Label.get_total_character_count());
			$Label2.set_visible_characters($Label2.get_total_character_count());
			$NextButton.modulate = Color(1, 1, 1, 1);
This code will check if you've just touched something. If so,
are the words for Label2 less than the total words for Label2? If so,
make ALL the words for Label1 show,
and make ALL the words for Label2 show.
And also make the next button show.
You know how when you're playing a game and the writing is really slow, you can press a button to skip ahead? This function does that.
Next, we have the three functions that tell the animation players what to do.
func TextBoxAppear():
	$AnimationPlayer.play("TextBoxAppear");

func PlushieAppear():
	$AnimationPlayer2.play("PlushieStageRight");

func PuppetAppear():
	$AnimationPlayer2.play("PuppetStageLeft");
The TextBox had a longer run time than the characters appearing, so I gave it its own animation player, that way it can run while the character also is appearing.
We'll call on these functions later. For right now, it's just important that they exist. Taft would call them helper functions.
Then we've got to deal with that LetterTimer. Back out of your script for a moment and click on the timer in your scene tree. Go to Node, and connect the node called timeout() to your main canvas layer.
That should land you back in your script. You may need to scroll to see your new call. Make it look like this:
func _on_LetterTimer_timeout():
	$Label.set_visible_characters($Label.get_visible_characters()+1)
	$Label2.set_visible_characters($Label2.get_visible_characters()+1)
The timer, when finished, will access your labels, and set their visible characters to 1 more than previously. We'll be setting them to start at 0 in a moment, so every time your timer (set to a wait time of .1 seconds) times out, it will make one more letter appear, that way it looks like your text box is typing.
I'm going to have you put in one more code that you don't really need yet, but you'll want shortly. It will take the place of your ready function when we've got everything up and running.
func _on_TextBlockHandler_iamhere():
	TextBoxAppear();
	set_01();
We're going to make a TextBlockHandler for your main game_window scene shortly, and it will signal over to here. When it does, this is what it will do - exactly what our ready function currently does.
These next two are examples so you can see how these should work, then you can add on your own.
func set_01():
	PlushieAppear();
	$Label.set_visible_characters(0);
	$Label.set_text("Anthro:");
	$Label2.set_visible_characters(0);
	$Label2.set_text("A game?");
	one_done = true;

func set_02():
	$PlushieFacingLeft.texture_happy();
	$Label.set_visible_characters(0);
	$Label.set_text("Anthro:");
	$Label2.set_visible_characters(0);
	$Label2.set_text("I wanna play!");
	two_true = true;
Remember in our ready function we called a function called set_01() ? Here it is, along with one of its brothers, set_02().
The first thing set_01() does is call the function PlushieAppear(), which we programmed as a helper function a moment ago. (It triggers the animation player to move Plushie onto the visible screen.)
Then it sets Label (the first label)'s visible characters to 0, so they appear as though from a typewriter. (You can skip this one if you want because...)
Then it tells Label (the first one) what text to display. We want it to display Character 1's name, so type their name and a colon so we know they're talking.
Then it does the same thing with Label2 except it tells that label what Character 1 is saying.
Last, it sets our variable called one_done to true. Remember we set a whole bunch of variables to false at the beginning? Now one of them is true. This will be important in a moment.
The second function, set_02(), is meant to run after set_01(), so we don't need to run PlushieAppear() a second time (because she's already on screen).
However, we DO want to change what texture she's displaying, so that we can change her expression. So set_02() takes the $PlushieFacingLeft node and tells it to perform a function called texture_happy().
(If you hop out of this scene for a moment and back over to your character's scene and subsequent script, you'll see we programmed a whole bunch of functions like that, which will change the textures of this particular thing.)
So set_02() has started by telling PlushieFacingLeft to change its texture, then reset the visible characters for both labels to 0, and told them to display the character name and the character's dialogue for chunk 2.
Finally, it sets our second variable, two_true to true. Now we've got two variables set to true.
I've actually got 9 of these, calling a second character to appear, some expressions to change, and some dialogue to be exchanged, but you guys can write your own.
After however many of those set functions you want, there's one more.
func _on_NextButton_pressed():
	if three_free == true:
		emit_signal("all_done");
		#Connect this to TextBoxHandler, as well as GameManager
		#as well as grid to tell them they're free to move again
		$NextButton.modulate = Color(1, 1, 1, 0);
	elif two_true == true:
		set_03();
		$NextButton.modulate = Color(1, 1, 1, 0);
	elif one_done == true:
		set_02();
		$NextButton.modulate = Color(1, 1, 1, 0);
Sorry, for this one, I added one more set (set_03), just so you could see how it works.
Back out of the script for a moment before I continue explaining and go to your NextButton. Click its Nodes and connect the pressed() signal to the main canvas layer.
Assuming it dropped you right back here at the last function we wrote, let's continue with the explanation.
IT IS SUPER IMPORTANT that you write these elif statements in reverse chronological order, so it will always check the furthest one first. Otherwise, you'll have stuff displaying wrong and wonder why.
So assuming that the scene started and displayed set_01()'s text and character, then finished. It will have made one_done equal to true.
When the next button is pressed, it will check if one_done = true, and if it does, then it will start function set_02(), and turn the Next button invisible again.
When set_02() is done, it will turn two_true to true. If you click the Next button, it will check if two_true = true, and if so, it will start set_03(), and turn the Next button inivisible again.
This can go on for howevermany set_00() functions you need. Just keep giving the script more numbers and more variables to check.
ON THE LAST ONE (which will be at the top of the function), we need to emit a signal that we set up waaaaaay back at the beginning of this script.
That signal will eventually go to our game_window and tell it "you're good to do whatever again". (Leave the little comment in the coding to remind yourself later.)
NOW... Your script for this is done. Save. Go back to 2D view, and hit F6 to test out just this scene. (Or, y'know, hit the "play scene" button, which looks like a movie clap-board icon.)
Double check that your scene runs how you want it to. Fix problems now before moving on.
One problem I kept running into was that I kept forgetting to make my NextButton use elif statements instead of normal if statements. That can foul up your order if you do it wrong. Just beware, is all.
*big breath* Okay, that's another chunk of this done.
Save, and save often.
The last thing we need to do is go back over to your main game_window scene. (The one we ALWAYS work in for most of Taft's stuff.)
Click on the game_window node and add a new child, a canvas layer. Drag it all the way up to the top of the list, so it's the first thing after the game_window node, even before the GameManager node.
In the Inspector, set your new canvas layer's Layer property to something big, like 10, so that it's overtop of all your other layers in your game.
Rename the new canvas layer TextBlockHandler. (This is what we called it in that last script, so if you call it something different, know that you're going to have to backtrack and change things.)
Now give it a script. A very simple script. It looks like this:
extends CanvasLayer

signal iamhere;

func _ready():
#	If using a text block, then remove the comment by this signal.
#	Also, connect the signal TO the text box, to start it.
#	Might also wanna "make unique" each instance where you use this.
#	emit_signal("iamhere");
	pass;
See? Nice and easy. It's got a signal, and a comment.
Save, and save often.
(When I wrote this, I don't remember if I had that final comment mark or not, so you might need to turn emit_signal on for a moment and then turn it back off.)
Back out of your script to 2D mode. Click on your TextBlockHandler, and go to its Node section. The iamhere signal will be there.
First, we need to connect it to the GameManager. Do that.
It'll drop you in the GameManager's script. Make that function look like this one, and add one more below it.
func _on_TextBlockHandler_iamhere():
	board_stable = false;

func _on_Level0TextBox_all_done():
	board_stable = true;
When the iamhere signal goes out, it tells the GameManager to shut off all functionality to the game until ... well, until the cut scene is done. So board_stable gets set to false.
Our second function is for a signal we set up over in the dialogue script, called all_done. When GameManager receives the all_done signal from our dialogue, it will set board_stable to true again, and the game will play as normal.
Well... it would. But we need to connect a few more things.
Click on your TextBlockHandler again, its Nodes, and connect iamhere ALSO to the grid's script.
Same thing:
func _on_TextBlockHandler_iamhere():
	can_move = false;

func _on_Level0TextBox_all_done():
	can_move = true;
When iamhere is sent out, the grid receives it and shuts down by setting can_move equal to false.
When our dialogue is done, it'll send out the all_done signal and that tells the grid to continue as it should; can_move = true.
Save.
DO NOT actually connect your dialogue scene's signals to the grid or game manager yet! Only the TextBlockHandler's signals should have gotten connected. (That is to say, don't get ahead of me!)
Also, if you deleted the comment tag by emit_signal in the TextBlockHandler, go put it back in. We're not actually going to emit that signal yet.
Save again. (You'll thank me.)
Following along with Taft's tutorials, you should have several trial levels already made. Pick one. You should probably put this on your Level 1, but I've already done one there, so my example is going to use Level 2. You guys use Level 1, though.
In your Level 1's scene tree, click on your TextBlockHandler. Scroll down in the Inspector to the script area. (Where you would add a new script.) See the tiny arrow there? Click it to expand the script options. You want to choose Make Unique! That way if you change the script here, it ONLY affects Level 1. Otherwise, you'll have repeating tutorials in every level, and no one wants that.
Now go into the TextBlockHandler's script and remove the comment tag right before the emit_signal. That'll turn on the iamhere signal, which will hijack your level as it's starting and make it un-playable until the cut scene is over.
Double check your TextBlockHandler's node to make sure it's still emitting to the GameManager and the grid.
Next, while you're still clicked on the TextBlockHandler, instance your dialogue scene. (Click on the icon above the scene tree that looks like a chain link, so you can link the scene with all your talking to the TextBoxHandler.)
I called my dialogue scene Level0TextBox because I wasn't sure when I started what level I would be putting it on. (Now I know I'm using Level 2.)
If you click on its script (the script for the scene you just instanced in) and go to line 125, you'll see we left ourselves a note about what we need to do next.
Click the node again, and go to its Node section by the Inspector. The all_done signal will be ready for you to use. First, connect it to the TextBlockHandler.
When it drops you back in that easy script, make the new function look like this:
func _on_Level0TextBox_all_done():
	remove_child($Level0TextBox);
That will get rid of the scene you instanced in, so it's no longer controlling your level.
I'm sorry we didn't leave that function as a permanent thing in your main game_window, but the inside node will change every time you use it. You'll just have to commit to memory that you need to destroy the scene.
We also want to connect the all_done signal to the GameManager.
It should automatically drop you on the function we wrote a moment ago that makes board_stable = true.
Go back and connect all_done to the grid.
It should automatically drop you on the function we wrote a moment ago that makes can_move = true.
One more thing, and it's annoying to me because its parent should handle it... Click on your instanced scene. Since it's a canvas layer, set its Layer property to something big, like 10. We did this to its parent already, so as far as I'm concerned, that should have set all of its children to have a layer of 10, but it doesn't. Stupid thing. So we have to fix it ourselves.
After that, you may want to play around with setting up preset pieces in certain places, so your tutorial characters can interact with the player. Or not. Up to you.
Here's an example on youtube.
Addendum:
This came up after the fact, but having the name print under the character would be a lot nicer looking, so...
To text-align to the right, center, left, or full-justify, add this snipit of code I've got highlighted in the following screen shot.
Substitute the number you need instead of 2. Right is 0, Center is 1, Right is 2, and Full is 3.
For an example in use, check this video.
New as of 8/7/2019
Obstacles as Goals
For anyone who wants to make obstacles like ice, concrete, locks, or slime into goals, let's real quick go over how to set it up.
In your main game_window scene, in the scene tree, you'll want to open your ice_holder, lock_holder, concrete_holder and slime_holder scenes and add similar coding to each of them, but with the keywords altered accordingly.
This stuff goes in the top, above the _ready function.
# Goal Signal Stuff
signal break_ice
export (String) var value
Now that you've set up a new export called "value", we need to program it. Back out and go to that node's inspector. You'll see the "value" option now there. Type in what you're calling each thing. (So, like, for the locks, you would fill in just the word lock. Mind your caps or lower cases, and your plurals or singles. Whichever you pick, use it consistently throughout this process.
Next up, down the bottom of the obstacle's script (so the one for the ice_holder or the lock_holder or whatever...) in the function that should be called something like _on_grid_damage_ice(board_position), add another emit_signal. This time we're typing:
emit_signal("break_lock", value);It will be sending the signal as well as telling whatever it's talking to the "value" that you just typed in the inspector a moment ago.
Now we need to connect those signals. The first place we're connecting the signal to is the GoalManager. (And I'm pretty sure Taft already walked us through this one, so we're really just duplicating it for every other obstacle.)
When you connect the signal to the GoalManager's script, it should open with a function. Make it look like this:
func _on_lock_holder_break_lock(goal_type):
	check_goals(goal_type);
Make sure you type in goal_type, otherwise it won't work. Then head back over to the holder you were working with before.
The second place we want to connect the new signal is the top_ui. That should open the top_ui's script. Change that one to look like this:
func _on_lock_holder_break_lock(goal_type):
	for i in goal_container.get_child_count():
		goal_container.get_child(i).update_goal_values(goal_type);
Again, make sure you type in goal_type, or it won't work.
If you added VernBurn's drop-down menu for selecting goals: then continue; else: you're done.
Head over to the Goal's script and go up to the top where Vern's script is for the goal choices. You'll want to add your own versions of these:
var ice_texture = load("res://art/Obstacles/ice.png");
var lock_texture = load("res://art/Obstacles/Locks1.png");
var concrete_texture = load("res://art/Obstacles/Concrete1.png");
var slime_texture = load("res://art/Obstacles/Slime_1.png");
Make sure you use your own paths and not mine, since mine are going to be unique from yours. But you get the idea.
Two lines down from that piece of code, in the export string, you'll also want to add these:
"none", "ice", "lock", "concrete", "slime"Only bother with "none" if you didn't use it the last time we went over it. And obviously, if you want to add or subtract some obstacles, do as you will.
Last, jump over to the GameManager again, in the function called create_goals. You should have a whole long list of if statements. Add these to it:
		if current.goal_string == "ice":
			goal_texture = current.ice_texture;
		if current.goal_string == "lock":
			goal_texture = current.lock_texture;
		if current.goal_string == "concrete":
			goal_texture = current.concrete_texture;
		if current.goal_string == "slime":
			goal_texture = current.slime_texture;
Obstacles with Health
I feel like we went over this so long ago that it's not important anymore, but it came up as a request to be included on this page, so... Here we go - how to give obstacles like Concrete multiple hits/health points.
The first example we're going to work with will be halfing the opacity of the main sprite. Open your ice scene. If you click on the main node 2d, which should be called ice, you should have a health setting in your inspector. Set it to 2 health.
If you don't have that in your inspector, add this to your obstacle's script/your ice's script:
export (int) var health;Now you should be able to put (whole number) numbers in your inspector to assign your obstacle an amount of hits it will take to destroy it/health points it has.
Further down your script, after your ready function, add this function:
func take_damage(damage):
	health -= damage;
	var sprite = get_node("Sprite");
	sprite.modulate = Color(1, 1, 1, .5);
The parenthesis damage is determined in a different scene altogether, just go with it.
IF you called your ice's sprite something besides "Sprite", then you'll need to change that word to whatever you named your sprite.
The last line will "modulate" (change) the new variable you just created on the previous line by... it's color. (Because we're using capital Color, it will actually change the thing's color.) The first three numbers after a capitalized Color command are the three color values - red, green, blue, I think. The final number value is the opacity (the see-through-ness). So with it set to .5, we're telling it to set the opacity to half-strength.
Save your scene. Hop back over to the game_window scene.
Go to your ice_holder node. There should be a function called _on_grid_damage_ice. Make sure it looks like this:
func _on_grid_damage_fog(board_position):
	if fog_pieces.size() != 0:
		if fog_pieces[board_position.x][board_position.y] != null:
			fog_pieces[board_position.x][board_position.y].take_damage(1);
			if fog_pieces[board_position.x][board_position.y].health <= 0:
				fog_pieces[board_position.x][board_position.y].queue_free();
				fog_pieces[board_position.x][board_position.y] = null;
				emit_signal("break_fog", value)
Alright, let's run through this in case Taft didn't, or it's been too long... (Sorry, my script says fog. Change yours to ice. I'm too lazy - dinner is waiting.)
First line says if the amount of fog pieces is not 0, keep going.
Second line says if the spot where your ice was is not null. (I don't know why it would be?)
Third line says the (ice) piece, at position x and y, needs to perform its own function called take_damage, and sub in the value 1. (Remember we were just messing with that function over in the ice scene? Here it is again.)
Fourth line says if the health of ... your ice, is less than or equal to 0 (which would only happen if something could do 2 damage, right? but whatever), then keep going...
Fifth line says (assuming the fourth line is true) queue free the spot.
Sixth line says (assuming the fourth line is true) that any ice spots at that location are now ... null. (idkwtfbbq)
Seventh line says (assuming the fourth line is true), emit a signal called "break_fog" and send out a value. (The "value" is the thing we programmed for export in the last topic up this page.)
Now, when the ice holder sees a reason to do damage to the ice, it'll automatically tell it do 1 damage. Back over in the ice's scene, when it sees it needs to take a damage, it'll set the see-through-ness to halfway. If it takes all damage, it will disappear completely and free up the space on the board.
For example number 2, we're going over to the Concrete scene.
I'm just going to copy-pasta this whole script for you.
extends Node2D

export (int) var health;
export (Texture) var light_damage;
export (Texture) var medium_damage;
export (Texture) var major_damage;

func take_damage(damage):
	health -= damage;
	if health == 3:
		$Sprite.texture = light_damage;
	if health == 2:
		$Sprite.texture = medium_damage;
	if health == 1:
		$Sprite.texture = major_damage;
So first, you've got your health export. I set my concrete to have 4 health. At 4 health, it is full and complete.
Then you've got some texture exports. Feel free to make your own. If you're using Taft's concrete, these damaged sprites will match.


Go ahead and load up your textures.
Don't need a ready function.
If you followed along with the ice taking damage a moment ago, you should recognize the function called take_damage(damage). Remember how the holder is telling this function to take damage (and parenthetically telling it take 1 damage)? Yeah.
So the function takes the "health" variable (which you should have programmed to be 4 a moment ago), and -= (subtracts) the "damage" (which the holder will be telling this scene is 1 because nothing does 2 damage yet).
Then, it checks the current amount of health that the concrete has. If 3, do this; if 2, do that; if 1, do the other thing.
(And with this one, like with the ice, it assumes your sprite is just named Sprite with caps. If you named it something else, you'll have to adjust the function to match your sprite's name.)
Head back over to the game_window scene and the concrete_holder node. Check to make sure this function matches yours:
func _on_grid_damage_concrete(board_position):
	if concrete_pieces.size() != 0:
		if concrete_pieces[board_position.x][board_position.y] != null:
			concrete_pieces[board_position.x][board_position.y].take_damage(1);
			if concrete_pieces[board_position.x][board_position.y].health <= 0:
				concrete_pieces[board_position.x][board_position.y].queue_free();
				concrete_pieces[board_position.x][board_position.y] = null;
				emit_signal("break_concrete", value);
				emit_signal("remove_concrete", board_position);
It's pretty much the same as the one from the ice holder, so you OUGHT to already have it. The only difference might be those last signals, which we went over on this page during the section where you make obstacles into goals.
As an aside, if you've made some new obstacle and you want it to do 2 or 3 damage. (Let's say... We make an obstacle called "bomb" and make the subsequent bomb.tscn and bomb_holder node in the game_window. If you want bombs to take 2 damage when they're hit, you would program that during this function. The third line, I think, it says "take_damage(1)". You would just change that 1 to something else. I don't know WHY you would want it to work that way, but that's what you would do.
New as of 8/2/2019
Finny's Sound and Music Buttons
From the main game start screen, you should be able to hit the Settings button and do the slide in/slide out animation to bring up the screen where you can hit a button and kill all music and sounds. That's lovely, except, what if you only want to kill the music? Or only the sounds? So Finngia found us a way to do so. (Clever girl!)
First, go to your SoundManager scene. Make sure you have two audio stream player nodes (one for music and one for sounds).
In the SoundManager script, make sure they're both set to be onready vars.
onready var music_player = $MusicPlayer;
onready var sound_player = $SoundPlayer;
You should already have functions called play random sound, play random music, play fixed sound, and play fixed music. The only function we're going to want to change is set_volume.
We need to separate the set_volume function into set_music_volume and set_sound_volume like so:
func set_music_volume():
	if ConfigManager.music_on:
		music_player.volume_db = -20;
		return;
	else:
		music_player.volume_db = -80;
		return;

func set_sound_volume():
	if ConfigManager.sound_on:
		sound_player.volume_db = -20;
		return;
	else:
		sound_player.volume_db = -80;
		return;
Then, in your Sound Manager's ready function, call them all like so:
func _ready():
randomize();
set_sound_volume();
play_random_music();
set_music_volume();
Switch over to the SettingsPanel and its script.
Add a signal for the music button and some exports.
signal music_change;

export (Texture) var music_on_texture;
export (Texture) var music_off_texture;
Back out for a moment and add some new textures for your music button. You'll probably have to fuss about with where you want it to show up in the scene, too.
Here's a button with two textures, if you need it.


Go back into the script and set your button's functions for being pressed.
func _on_MiddleButton_pressed():
ConfigManager.music_on = !ConfigManager.music_on;
change_music_texture();
ConfigManager.save_config();
SoundManager.set_music_volume();

SoundManager.play_fixed_sound(0);
(That last line is optional - it's just a way to let you know you pressed a button.)
Create a new function for changing the textures.
func change_music_texture():
if ConfigManager.sound_on == true:
$"MarginContainer/GraphicandButtons/Buttons/MiddleButton".texture_normal = music_on_texture;
else:
$"MarginContainer/GraphicandButtons/Buttons/MiddleButton".texture_normal = music_off_texture;
(Obviously if didn't call it MiddleButton, then call it whatever YOU called it. I called mine Button3.)
And make sure you alter your _on_Game_Menu_read_sound() function.
func _on_Game_Menu_read_sound():
change_sound_texture();
change_music_texture();
Now you should be good! Have fun with your new music button!
3 Stars
Forget everything we previously wrote about this. We're changing some and adding more. So ... I just moved the whole section up here and am re-going over everything.
I'm sorry to say, you guys ought to double-check what you've got against this, since I'm likely changing it to keep up with things.
Substitute your own, yes, but here you've at least got some size comparison for pixel height and width and whatnot. Or use these. I don't overly care.
New UI thingy (version 4, to accomodate up to 6 goals)
New blank star
New lit-up star

On map, no stars
On map, 1 star

On map, 2 stars

On map, 3 stars

Also made a smaller version for a particle effect - put in your particles folder.

Drop those in your appropriate folders (or edit and then drop them in), and get Godot up and running so it can import some things.
Setting up the GoalStar.tscn
New scene. Type is Node2D. Child a Sprite. Name the Node2D GoalStar. Give the Sprite the empty star art. In the Inspector, in the Offset, hit the checkbox for Centered, and set the X offset to 14.5 - this is important because the Sprite's size is 29 pixels. If you alter it to suit your own art style, fine, but be mindful to set this setting to HALF of your sprite's width.
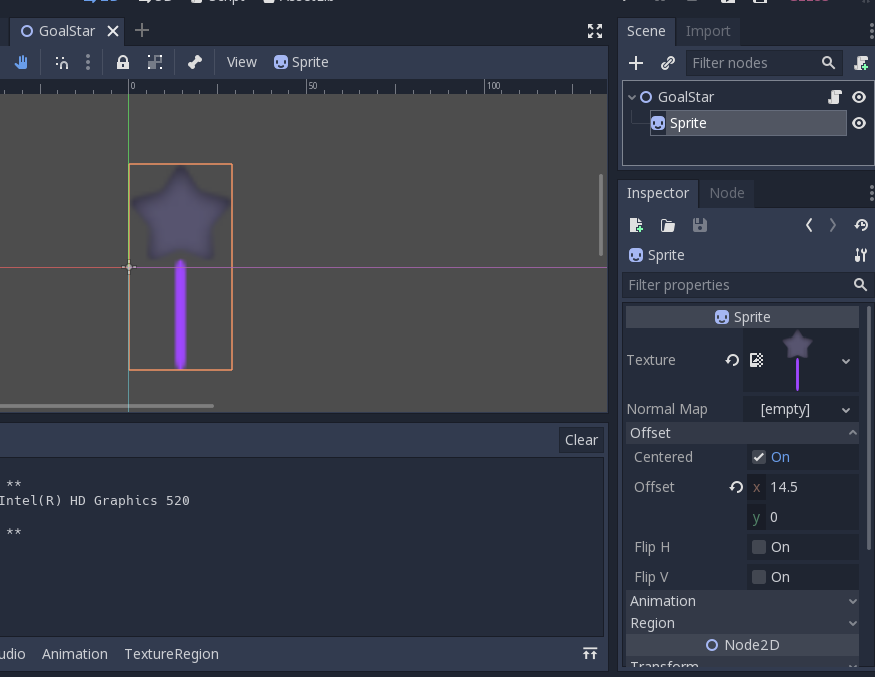
Save the scene as GoalStar.tscn. Time to move on to the script.
Give GoalStar (the node2d) a script and name it something like ScoreBarStarScript.gd - so we're all on the same page. In it, we're assigning two texture exports, and writing a function to change from one to the other.
extends Node2D

export (Texture) var goal_not_met;
export (Texture) var goal_met;

func change_texture():
	$Sprite.texture = goal_met;
That means when you click on GoalStar (the node2D) you'll now see two spots for textures in the Inspector. Fill them up with the appropriate star empty and star filled art.
Save the scene, close it out - this one's done. (Stick a fork in it.)
Setting up the StarSplosion.tscn
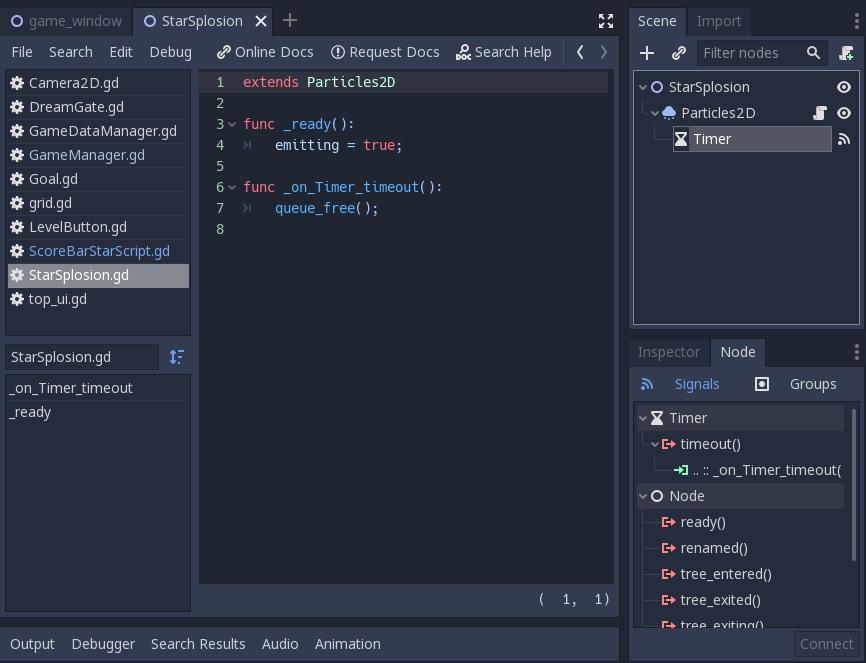
When our star goals on the score bar light up, we want them to do a little star 'splosion, so let's set that up.
New scene of type Node2D. Name it whatever. (I went with StarSplosion.tscn) Child a particles2D. Give it a script. (I called the script StarSplosion.gd) In the ready function, set emitting = true. Click on the Particles node and add a child Timer. In Node, connect the Timer's timeout signal to the Particles' script.
Should look like this:
Now the pain in the arse part is setting up the Particles. I'll try to do this as best I can, but feel free to do your own.
Emitting (off)
Amount 5
Lifetime .7
OneShot (on)
Speedscale 1
FractDelta (on)
Don't forget to scroll down and add the texture.
Now comes the super annoying part...
Process Material / Material /
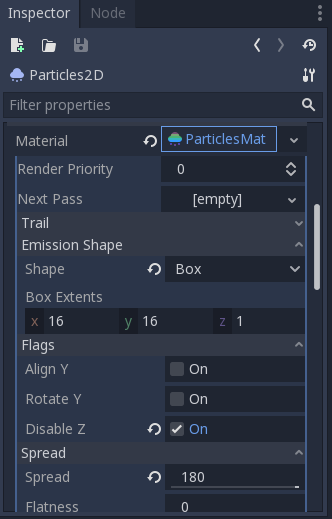
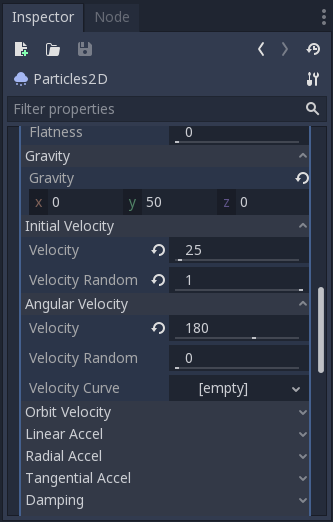
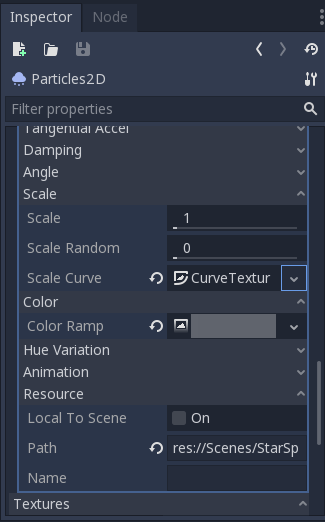
And I'm sorry, those scale curve and color ramp things... You're gonna have to go look up Mister Taft's tutorial on these stupid things - because I don't even remember.
Save. Quit. This one's good to go.
game_window's GameManager gets an update
Head to your main game_window scene, to the GameManager node. (This is also where you'll be fixing your level size in each individual level's scene in case you missed that discussion. And where you'll need to RE-tell each level what its level number is if you want them to load properly on the map.)
Above the ready function, but below your other stuff, make a new section for # Star Stuff.
# Star Stuff
export (int) var small_score_goal;
export (int) var mid_score_goal;
export (int) var large_score_goal;
signal set_score_goals;
This will give us export spots to write in what score we want our star markers to appear at, shortly. For purposes of this, my max score is 1000, and I'm setting my small, mid, and large score goals to 500, 600, and 900. You can do whatever you want, and really, they ought to be different on every single level.
Go ahead and hit save, backout to the Inspector, and assign some score goals. Then come back. (That way you don't forget, later.)
Next, (still in your GameManager script), in your func setup, right above all of your other emit signals, make a new one.
emit_signal("set_score_goals", small_score_goal, mid_score_goal, large_score_goal, max_score);
See that underlined chunk at the end? That wasn't there the first time we did this. Add it in now.
This will send all of those exports you just made over to... something else. Let's assign that now, while we're thinking of it.
Hit save, backout to the Inspector/Node area and connect the new signal called "set_score_goals" to the top_ui.
Probably, connecting them will have dumped you into the topUI's script. Jump back over to the GameManager.
BUT WAIT, THERE'S MORE!
This time through, we're adding something extra to effect our map once a level is completed. While still in your main game_window, in the GameManager's script, make sure your func check_game_win looks like this:
func check_game_win():
	if goals_met() and board_stable:
		emit_signal("game_won");
		var stars
		if current_score < small_score_goal:
			stars = 0;
		elif current_score >= small_score_goal and current_score < mid_score_goal:
			stars = 1;
		elif current_score >= mid_score_goal and current_score < large_score_goal:
			stars = 2;
		elif current_score >= large_score_goal:
			stars = 3;
		GameDataManager.level_info[level] = {
			"unlocked": true,
			"high score": current_score,
			"stars unlocked": stars
		};
		GameDataManager.level_info[level + 1] = {
			"unlocked": true,
			"high score": 0,
			"stars unlocked": 0
		};
		game_won = true;
I kinda had to scavenge MisterTaft's wip coding from a while back to get this to work. Hope he doesn't mind.
Now we're actually done with this one, so save and back out.
top_ui's scene gets a makeover - kinda
So first off, back out to the top_ui's base texture rect. (You know, the layer that's actually CALLED top_ui.) In the Inspector, update its Texture with that slightly bigger one. At some point you're going to want a larger area for goals. You know it. And we kinda need more room for the score bar if we're tacking in some stars.
PROBABLY... we should alter some margins at this point, but I'm lazy. Goodbye margins. We may be back for you later.
The next thing we want to do is create some layers. If you know how to do this better than me, good on ya. Here's how I did it, though.
In the VBoxContainer, add a child CanvasLayer. Duplicate it. (CanvasLayer2) Throw your ScoreLabel and Texture Progress in the first one. Then, click on it (CanvasLayer, just so you're keeping up) and view the Inspector. See that thing called Layer? Change it to 2. That moves it closer from the background towards the user's eye.
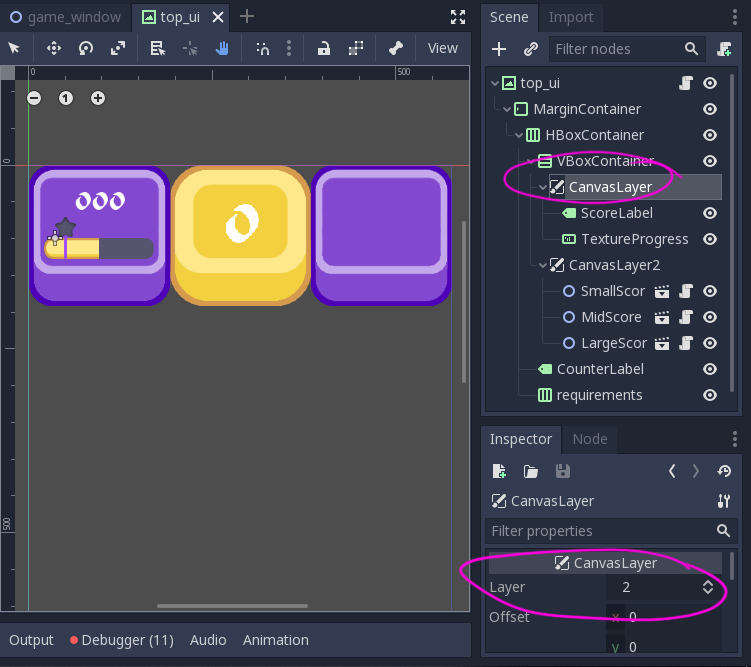
Ack! One more thing. Since we're moving things about visually because of changing our top_ui's artwork, we need to nudge some things down. Click on your TextureProgress and go to the Inspector. In the Rect section, set the Position Y to something like 100.
Okay, next, click on CanvasLayer2 and instance our new GoalStar.tscn. (Y'all remember how to instance scenes, right? Up there next to the plus sign that lets you add children nodes, there's a chain link symbol that lets you link other scenes to the one you're currently in.)
Oh! Wait! Before I forget, click on your CanvasLayer2 once more. Go to the Inspector and the Layer property. Set it to 3. That makes it the closest thing to the user's eye.
(We have now reached all the more importance the Canvas Layers will be. Their sole purposes is to put the star markers layered overtop of the TextureProgress bar.)
Duplicate your GoalStar.tscn so you have 3 of them.
Now we've got to rename each of them, so we can tell them to do different things. For now, (you can change things later), go with SmallScoreGoalStar, MidScoreGoalStar, and LargeScoreGoalStar. Godot shouldn't mind that you're renaming them once they're instanced into another scene.
Before we leave these alone, hit up the Inspector for each one. In the Transform section, set the Position y to 100, so we line up with the TextureProgress.
Okay, enough of that. Head back to the top_ui's main node (the TextureRect called top_ui). We've got a lot to do in here, and I'm not sure how important all of it is - so if you wanna play around with deleting some of the superfluous things, have fun. Don't cry when something breaks.
In top_ui's script, up at the top, add in this chunk
onready var SmallScoreGoalStar = $MarginContainer/HBoxContainer/VBoxContainer/CanvasLayer2/SmallScoreGoalStar;
onready var MidScoreGoalStar = $MarginContainer/HBoxContainer/VBoxContainer/CanvasLayer2/MidScoreGoalStar;
onready var LargeScoreGoalStar = $MarginContainer/HBoxContainer/VBoxContainer/CanvasLayer2/LargeScoreGoalStar;

var new_small_score_goal = 1;
var new_mid_score_goal = 1;
var new_large_score_goal = 1;
var new_max_score = 1;
var small_score_met = false;
var mid_score_met = false;
var large_score_met = false;

var particle_effect = preload("res://Scenes/StarSplosion.tscn");
Again, bold/underlined thingies are new!
The first three are creating variable names that we can use all over this script, but it wanted me to make them onready vars, so... Whatever.
The next three I had to rename so I could use them later all throughout the script, so... again, hadda set them to something.
The last three are there because the stupid print statements kept firing off constantly after I hit a score goal, so I needed a way to tell them SHUTUP!
Next, we're messing with two functions.
I know you guys probably copy pasted them before, but humor me - do it again. I changed a lot of crap in here.
func _on_GameManager_set_score_goals(small_score_goal, mid_score_goal, large_score_goal, max_score):
	if !score_bar:
		score_bar = $MarginContainer/HBoxContainer/VBoxContainer/CanvasLayer/TextureProgress;
	if !score_label:
		score_label = $MarginContainer/HBoxContainer/VBoxContainer/CanvasLayer/ScoreLabel;
	new_small_score_goal = small_score_goal;
	new_mid_score_goal = mid_score_goal;
	new_large_score_goal = large_score_goal;
	new_max_score = max_score;
	var SmallScoreGoalStar = $MarginContainer/HBoxContainer/VBoxContainer/CanvasLayer2/SmallScoreGoalStar;
	var MidScoreGoalStar = $MarginContainer/HBoxContainer/VBoxContainer/CanvasLayer2/MidScoreGoalStar;
	var LargeScoreGoalStar = $MarginContainer/HBoxContainer/VBoxContainer/CanvasLayer2/LargeScoreGoalStar;
	var score_bar_width = score_bar.rect_size
	SmallScoreGoalStar.position.x = score_bar_width.x*(float(small_score_goal)/max_score);
	MidScoreGoalStar.position.x = score_bar_width.x*(float(mid_score_goal)/max_score);
	LargeScoreGoalStar.position.x = score_bar_width.x*(float(large_score_goal)/max_score);

func _on_GameManager_set_score_info(new_max, new_current):
	if !score_bar:
		score_bar = $MarginContainer/HBoxContainer/VBoxContainer/CanvasLayer/TextureProgress;
	if !score_label:
		score_label = $MarginContainer/HBoxContainer/VBoxContainer/CanvasLayer/ScoreLabel;
	score_bar.max_value = new_max;
	score_bar.value = new_current;
	score_label.text = String(new_current);
	if small_score_met == false:
		if score_bar.value >= new_small_score_goal:
			print("small score goal reached");
			SmallScoreGoalStar.change_texture();
			var current1 = particle_effect.instance();
			current1.position = SmallScoreGoalStar.position
			add_child(current1);
			small_score_met = true;
	if mid_score_met == false:
		if score_bar.value >= new_mid_score_goal:
			print("mid score goal reached");
			MidScoreGoalStar.change_texture();
			var current2 = particle_effect.instance();
			current2.position = MidScoreGoalStar.position
			add_child(current2);
			mid_score_met = true;
	if large_score_met == false:
		if score_bar.value >= new_large_score_goal:
			print("large score goal reached");
			LargeScoreGoalStar.change_texture();
			var current3 = particle_effect.instance();
			current3.position = LargeScoreGoalStar.position
			add_child(current3);
			large_score_met = true;
In both functions, the if !score_bar and if !score_label were because the signals were calling the damnable things before they had time to load. Don't question it, just go with it. I did trial and error.
In the set_score_goals function, the next several lines are taking the values we received from the signal and assigning them to those variables we programmed when we started. (Remember the ones that were = 1 and that seemed really stupid? It's because we're overriding them here.)
Then we have to set up four variables for use in the function. The three instanced scenes we brought over become variables, and then the score bar becomes a variable so that we can get its stupid size. (Oooh, I had words with this thing over how to get its size. You don't even wanna know.)
Finally, we take each star's instanced scene (as the new variable we created) and set its x position to be equal to the RELATIVE place along the TextureProgress. (NO SMALL TASK, THANK YOU VERY MUCH!!!!) Actually, thank you Vern. You were most helpful in figuring this out. Also thanks to that southern-y-sounding youtube guy with the angry teddy bear videos. I think his username was Game Endeavor. He's got a good series, so go look it up.
This has been redone! The position formula is new, so you DO need to re-copy-and-paste everything. It uses floats, now, though I'm only a trifle closer to understanding that they're programming's way of interpreting decimal numbers.
Then, in the set_score_info function, after all of Tafty's stuff, we needa add in checks for if the score goals are met.
We check if they're already false during each score update call. If they are, we check if they're greater than or equal to the value we specified as their goal. I guess you can delete my print statements that were to make sure they were working... Then we change the texture of the star scenes, just like we change textures on pieces to make them bombs. Last, it marks the true/false thing to true so it stops making checks and calls and printing out the wazoo that YES, WE KNOW WE MET THE GOAL!!!!
Also new, that second function now controls the particles you made earlier on.
That's it for this scene. Save and back out.
LevelButton scene needs to put on some textures
Open your LevelButton.tscn. We're gonna be there for a bit. Open its script.
First off, up top, we need to add some more exports. (I love exports.)
In # Level Stuff, add these:
export (bool) var small_score_goal_met;
export (bool) var mid_score_goal_met;
export (bool) var large_score_goal_met;
Update your # Texture Stuff to look like this:
export (Texture) var blocked_texture;
export (Texture) var open_texture;
export (Texture) var small_goal_met;
export (Texture) var mid_goal_met;
export (Texture) var large_goal_met;
export (Texture) var goal_not_met;
Save. Back out. Add those textures from the start of all this into their appropriate spots. (the blank star trio, one star filled, etc...)
Save again. Re-open the script.
Hoooh boy... This is a biggie. (*pushes up sleeves*) Alright, kids, let's get to work.
Func _ready and setup - copy pasta, please.
func _ready():
	if GameDataManager.level_info.has(level_actual_number):
		enabled = GameDataManager.level_info[level_actual_number]["unlocked"];
		if GameDataManager.level_info[level_actual_number]["stars unlocked"] == 0:
			small_score_goal_met = false;
			mid_score_goal_met = false;
			large_score_goal_met = false;
		elif GameDataManager.level_info[level_actual_number]["stars unlocked"] == 1:
			small_score_goal_met = true;
			mid_score_goal_met = false;
			large_score_goal_met = false;
		elif GameDataManager.level_info[level_actual_number]["stars unlocked"] == 2:
			small_score_goal_met = true;
			mid_score_goal_met = true;
			large_score_goal_met = false;
		elif GameDataManager.level_info[level_actual_number]["stars unlocked"] == 3:
			small_score_goal_met = true;
			mid_score_goal_met = true;
			large_score_goal_met = true;
	else:
		enabled = false;
	setup();

func setup():
	level_label.text = String(level_to_display);
	if enabled:
		button.texture_normal = open_texture;
	else:
		button.texture_normal = blocked_texture;
	if small_score_goal_met == true and mid_score_goal_met == false and large_score_goal_met == false:
		star.texture = small_goal_met;
	elif small_score_goal_met == true and mid_score_goal_met == true and large_score_goal_met == false:
		star.texture = mid_goal_met;
	elif small_score_goal_met == true and mid_score_goal_met == true and large_score_goal_met == true:
		star.texture = large_goal_met;
	elif small_score_goal_met == false and mid_score_goal_met == false and large_score_goal_met == false:
		star.texture = goal_not_met;
Anyplace I wrote "level_actual_number" I think you guys can swap out to just "level". I have a wonky thing where from the start menu, you can go to a left path or a right path. They'll both display levels called "1" through "115", but they're not ACTUALLY the same levels, so I had to come up with a way to SHOW numbers 1-115, but have some of them actually be 116-230. Don't mind me. As you were.
Those bools we programmed in the beginning, but didn't turn on? We're letting the communication between the GameDataManager and here tell them if they should be on or off. All they affect is if the textures change.
Honestly, there's probably a more elegant way to do what I did, but this works. If you wanna rewrite it, have fun.
A word of caution
In your default game_window screen. ANY number you put into an export can eventually override numbers you put into your levels. Always try to double check and save your levels individually! I set my game_window scene's max_score and subsequent score goals to 0, and wound up having to re-enter them manually on all of my levels. However, then, when I tried to test the game using just the game_window scene, it read my 0s and said, "ERROR! YOU HAVE ZEROES! RAWR!" So... Set them to something while you're still working on it, but be mindful of how they affect your other levels.
New as of 7/29/19
More than 3 goals?
So one of the things noticed in the last two days was that if you have more than three goals, they kinda overrun their margin container. This can be a problem if you've got a level that needs 4, 5, or 6 goals. (Honestly, I've never seen a game that had more than 5 goals, but they laid theirs out differently.)
Anyway, a couple of ideas were looked at before a GLORIOUS discovery was made! I thought we were going to need to nest two horizontal containers inside a vertical container for our goals, BUT NO! There's this awesome thing called a GRID container! (*gasp!*) So let's look at that!
First off, I changed the top ui art again. Sorry. Deal.
That gives us more room for our multiple goals.
Update that and head over to the top_ui scene. In the scene tree, right click on the node called "requirements" and do "change type". We want to change it to a GridContainer.
Glorious things, these. But we need to tweek a few settings in case you ONLY want one goal for a few scenes. (You know, like the first five levels or something - where it's easy.)
Click on "requirements" (once it's a GridContainer) and go to the Inspector. The first thing you want to do is set the columns. I set mine to 3, but by all means, play around with yours. If you resize your goalprefab stuff, you might be able to fit four. I didn't want my goals that small because the text became hard to read.
Next, go down to the Size Flags. Match them to this pic:
Jump back over to your game_window. In the GoalHolder, duplicate your Goal node a few times. (I set mine to have 5 of them.) Set each goal. (I love Vern's new goal select thingy.)
Then if you hit play, it should look like this:
Everything's all nice and lined up in a grid. =) Since it's got three columns to work with, once it sees it has more than three things to put in, it'll start on the next row of things. Isn't that handy?! I love it!
New as of 7/28/19
VernBurn's update to the goal stuffs. Edit as you need.
Vern was nice enough to make some of our editor stuff a little more user-friendly. Thanks Vern - you're a cool dude!
In the goal.gd, he altered things to look like this:
In the game_window, in the GameManager, at the function create_goals, he did this:
The result is that when you're in the game_window (or each level's scene), and click on the GoalHolder/Goal, you get a nifty little drop-down menu for selecting what things are available as goals.
Obviously, add whatever obstacles or such you want as well on your own - Vern just set us up some basics.
Slight update! In the Goal node's script, in the export string where you list all of your possible goals, add one more called "none" or "empty". The drop-down will always need something selected, so if you don't select anything, it will default to option number 1.
This is our old stuff. From when Tafty was away.
Add to Counter Booster
First off, Finngia was sayin' that her add to counter booster wasn't working anymore. So we hadda fix that.
In the grid script's top area:
#Booster Stuff
var current_booster_type = "";
signal add_count;
Then, futher toward the bottom:
func booster_input():
	if Input.is_action_just_pressed("ui_touch"):
		if current_booster_type == "Color Bomb":
			make_color_bomb(pixel_to_grid(get_global_mouse_position().x, get_global_mouse_position().y));
		elif current_booster_type == "Add Counter":
			var temp = get_global_mouse_position()
			if is_in_grid(pixel_to_grid(temp.x, temp.y)):
				add_counter();
		elif current_booster_type == "Destroy Piece":
			make_destroy_piece(pixel_to_grid(get_global_mouse_position().x, get_global_mouse_position().y));
		elif current_booster_type == "Row Bomb":
			make_row_bomb(pixel_to_grid(get_global_mouse_position().x, get_global_mouse_position().y));
		elif current_booster_type == "Column Bomb":
			make_column_bomb(pixel_to_grid(get_global_mouse_position().x, get_global_mouse_position().y));
		elif current_booster_type == "Plus Sign Bomb":
			make_plus_bomb(pixel_to_grid(get_global_mouse_position().x, get_global_mouse_position().y));
		elif current_booster_type == "Adjacent Bomb":
			make_adjacent_bomb(pixel_to_grid(get_global_mouse_position().x, get_global_mouse_position().y));
... mighta gotten a little carried away in the booster department. But science! We had to test things, and boosters were a convenient way to do so!
Anyway, back to the add to counter booster... We connected grid script's "add counter" signal to the GameManager to this end:
func _on_grid_add_count():
	if is_moves:
		current_counter += 5;
	else:
		current_counter += 10;
	emit_signal("update_counter_info", current_counter);
Our Booster script got kinda long...
extends TextureButton

enum {make_color_bomb, add_to_counter, destroy_piece};
var state;

var active = false;
var active_texture;

export (Texture) var color_bomb_texture;
export (Texture) var add_counter_texture;
export (Texture) var destroy_piece_texture;
export (Texture) var adjacent_bomb_texture;
export (Texture) var row_bomb_texture;
export (Texture) var column_bomb_texture;
export (Texture) var plus_sign_bomb;
var type = "";

func check_active(is_active, booster_type):
	if is_active:
		if booster_type == "Color Bomb":
			texture_normal = color_bomb_texture;
			type = "Color Bomb";
		elif booster_type == "Add Counter":
			texture_normal = add_counter_texture;
			type = "Add Counter";
		elif booster_type == "Destroy Piece":
			texture_normal = destroy_piece_texture;
			type = "Destroy Piece";
		elif booster_type == "Adjacent Bomb":
			texture_normal = adjacent_bomb_texture;
			type = "Adjacent Bomb";
		elif booster_type == "Row Bomb":
			texture_normal = row_bomb_texture;
			type = "Row Bomb";
		elif booster_type == "Column Bomb":
			texture_normal = column_bomb_texture;
			type = "Column Bomb";
		elif booster_type == "Plus Sign Bomb":
			texture_normal = plus_sign_bomb;
			type = "Plus Sign Bomb";
	else:
		texture_normal = null;
		type = "";
However, for all the good this did, it didn't fix the game-over trigger when the move counter reaches 0. I said to the gang, we can reconnect the signals and make it work again, but for all we know, Taft intends to move triggers for game over or the state machine or idkwhatelse over to the GameManager, and then we'll have wasted our time. So if you could let us know your plan of attack, that would be great. Please and Thank you! =)
Mallet Booster
Then we tried to make that mallet booster. (We called it Destroy Piece.) Back-reference that huge chunk of Booster Input code for the call.
Here's the function we made for that (put in the grid script, under the booster_input function).
func make_destroy_piece(grid_position):
	if is_in_grid(grid_position):
		if all_pieces[grid_position.x][grid_position.y] != null:
			match_and_dim(all_pieces[grid_position.x][grid_position.y]);
			destroy_matched();
			state = move;
Row Bomb & Column Bomb Boosters


I'm probably going out of chronological order for what we did, but we determined we needed a row bomb and a column bomb to test things. So we made them by following the example for the make_color_bomb. Again, back-reference the booster input chunk of code.
func make_row_bomb(grid_position):
	if is_in_grid(grid_position):
		if all_pieces[grid_position.x][grid_position.y] != null:
			all_pieces[grid_position.x][grid_position.y].make_row_bomb();
			state = move;

func make_column_bomb(grid_position):
	if is_in_grid(grid_position):
		if all_pieces[grid_position.x][grid_position.y] != null:
			all_pieces[grid_position.x][grid_position.y].make_column_bomb();
			state = move;
Plus Sign Booster

Oh! That's right! We wanted those in order to test out bomb interactions. I'll come back to those. Before we finish up talking about boosters, we also made a plus-sign booster. (Again, because we were trying to do interactions and this was the easiest way to do it.)
func make_plus_bomb(grid_position):
	if is_in_grid(grid_position):
		if all_pieces[grid_position.x][grid_position.y] != null:
			all_pieces[grid_position.x][grid_position.y].make_plus_bomb();
			state = move;
Adjacent Bomb Booster

This one came along pretty early but we didn't need it for testing until, like, the last day of the weekend, when we were working on different bomb interactions.
func make_adjacent_bomb(grid_position):
	if is_in_grid(grid_position):
		if all_pieces[grid_position.x][grid_position.y] != null:
			all_pieces[grid_position.x][grid_position.y].make_adjacent_bomb();
			state = move;
Bomb Interactions

Taft thinks writing bomb interactions is too time consuming.
In the grid script, in the swap_pieces function.
func swap_pieces(column, row, direction):
	var first_piece = all_pieces[column][row];
	var other_piece = all_pieces[column + direction.x][row + direction.y];
	if first_piece != null && other_piece != null:
		if !restricted_move(Vector2(column, row)) && !restricted_move(Vector2(column, row) + direction):
			if first_piece.color == "Color" and other_piece.color == "Color":
				clear_board();
			if first_piece.is_row_bomb and other_piece.color == "Color":
				row_to_color(first_piece, other_piece);
			if first_piece.color == "Color" and other_piece.is_row_bomb:
				color_to_row(first_piece, other_piece);
			if first_piece.is_column_bomb and other_piece.color == "Color":
				column_to_color(first_piece, other_piece);
			if first_piece.color == "Color" and other_piece.is_column_bomb:
				color_to_column(first_piece, other_piece);
			if first_piece.is_adjacent_bomb and other_piece.color == "Color":
				adjacent_to_color(first_piece, other_piece);
			if first_piece.color == "Color" and other_piece.is_adjacent_bomb:
				color_to_adjacent(first_piece, other_piece);
			if first_piece.color == "Color" and other_piece.is_plus_bomb:
				color_to_plus(first_piece, other_piece);
			if first_piece.is_plus_bomb and other_piece.color == "Color":
				plus_to_color(first_piece, other_piece);
			if first_piece.is_adjacent_bomb and other_piece.is_adjacent_bomb:
				adjacent_to_adjacent(column, row);
			if first_piece.is_adjacent_bomb and other_piece.is_column_bomb:
				adjacent_to_column(first_piece, other_piece, column, row, direction);
			if first_piece.is_column_bomb and other_piece.is_adjacent_bomb:
				adjacent_to_column(first_piece, other_piece, column, row, direction);
			if first_piece.is_adjacent_bomb and other_piece.is_row_bomb:
				adjacent_to_column(first_piece, other_piece, column, row, direction);
			if first_piece.is_row_bomb and other_piece.is_adjacent_bomb:
				adjacent_to_column(first_piece, other_piece, column, row, direction);
			if first_piece.is_column_bomb and other_piece.is_row_bomb:
				column_to_row(first_piece, other_piece, column, row, direction);
			if first_piece.is_row_bomb and other_piece.is_column_bomb:
				row_to_column(first_piece, other_piece, row, column, direction);
			if first_piece.is_column_bomb and other_piece.is_column_bomb:
				column_to_column(first_piece, other_piece, column);
			if first_piece.is_row_bomb and other_piece.is_row_bomb:
				row_to_row(first_piece, other_piece, row);
			if is_color_bomb(first_piece, other_piece):
				if is_piece_collectible(column, row) or is_piece_collectible(column + direction.x, row + direction.y):
					swap_back();
					return;
				if first_piece.color == "Color":
					match_color(other_piece.color);
					match_and_dim(first_piece);
					add_to_array(Vector2(column, row));
				else:
					match_color(first_piece.color);
					match_and_dim(other_piece);
					add_to_array(Vector2(column + direction.x, row + direction.y));
			store_info(first_piece, other_piece, Vector2(column, row), direction);
			state = wait;
			all_pieces[column][row] = other_piece;
			all_pieces[column + direction.x][row + direction.y] = first_piece;
			first_piece.move(grid_to_pixel(column + direction.x, row + direction.y));
			other_piece.move(grid_to_pixel(column, row));
			if !move_checked:
				find_matches();
I have never before in my life wished that code blocks used color... Alas, I am too impatient to code it myself. There are other things to do.
All of that (*waves upward*) means you'll need all of this somewhere below it.
func color_to_row(first_piece, other_piece):
	for i in width:
		for j in height:
			if all_pieces[i][j] != null and !is_piece_collectible(i, j):
				if all_pieces[i][j].color == other_piece.color:
					match_and_row_bomb(all_pieces[i][j]);

func row_to_color(first_piece, other_piece):
	for i in width:
		for j in height:
			if all_pieces[i][j] != null and !is_piece_collectible(i, j):
				if all_pieces[i][j].color == first_piece.color:
					match_and_row_bomb(all_pieces[i][j]);

func color_to_column(first_piece, other_piece):
	for i in width:
		for j in height:
			if all_pieces[i][j] != null and !is_piece_collectible(i, j):
				if all_pieces[i][j].color == other_piece.color:
					match_and_column_bomb(all_pieces[i][j]);

func column_to_color(first_piece, other_piece):
	for i in width:
		for j in height:
			if all_pieces[i][j] != null and !is_piece_collectible(i, j):
				if all_pieces[i][j].color == first_piece.color:
					match_and_column_bomb(all_pieces[i][j]);

func color_to_adjacent(first_piece, other_piece):
	for i in width:
		for j in height:
			if all_pieces[i][j] != null and !is_piece_collectible(i, j):
				if all_pieces[i][j].color == other_piece.color:
					match_and_adjacent_bomb(all_pieces[i][j]);
					if all_pieces[i][j].is_adjacent_bomb:
						find_adjacent_pieces_for_color_bombs(i, j)
						find_matches();

func adjacent_to_color(first_piece, other_piece):
	for i in width:
		for j in height:
			if all_pieces[i][j] != null and !is_piece_collectible(i, j):
				if all_pieces[i][j].color == other_piece.color:
					match_and_adjacent_bomb(all_pieces[i][j]);
					if all_pieces[i][j].is_adjacent_bomb:
						find_adjacent_pieces_for_color_bombs(i, j)
						find_matches();

func color_to_plus(first_piece, other_piece):
	for i in width:
		for j in height:
			if all_pieces[i][j] != null and !is_piece_collectible(i, j):
				if all_pieces[i][j].color == other_piece.color:
					match_and_plus_bomb(all_pieces[i][j]);

func plus_to_color(first_piece, other_piece):
	for i in width:
		for j in height:
			if all_pieces[i][j] != null and !is_piece_collectible(i, j):
				if all_pieces[i][j].color == first_piece.color:
					match_and_plus_bomb(all_pieces[i][j]);

func adjacent_to_adjacent(column, row):
	for i in range(-2, 3):
		for j in range(-2, 3):
			if is_in_grid(Vector2(column + i, row + j)):
				if all_pieces[column + i][row + j] != null and !is_piece_collectible(column + i, row + j):
					if all_pieces[column + i][row + j].is_row_bomb and !is_piece_collectible(column + i, row + j):
						match_all_in_row(j);
					if all_pieces[column + i][row + j].is_column_bomb and !is_piece_collectible(column + i, row + j):
						match_all_in_column(i);
					if all_pieces[column + i][row + j].is_color_bomb:
						match_color(all_pieces[column + i][row + j]);
					all_pieces[column + i][row + j].matched = true;

func adjacent_to_column(first_piece, other_piece, column, row, direction):
	for i in width:
		for j in height:
			if is_in_grid(Vector2(i,j)):
				if all_pieces[i][j] != null and !is_piece_collectible(i,j):
					first_piece.make_normal_piece();
					other_piece.make_normal_piece();
					if first_piece.is_normal_piece and other_piece.is_normal_piece:
						match_all_in_trio_plus(column + direction.x, row + direction.y);

func row_to_column(first_piece, other_piece, row, column, direction):
	for i in width:
		for j in height:
			if is_in_grid(Vector2(i, j)):
				if all_pieces[i][j] != null and !is_piece_collectible(i, j):
					if first_piece.is_row_bomb:
						if other_piece.is_column_bomb:
							first_piece.make_normal_piece();
							other_piece.make_normal_piece();
							match_all_in_plus(column + direction.x, row + direction.y);

func column_to_row(first_piece, other_piece, column, row, direction):
	for i in width:
		for j in height:
			if is_in_grid(Vector2(i, j)):
				if all_pieces[i][j] != null and !is_piece_collectible(i, j):
					if first_piece.is_column_bomb:
						if other_piece.is_row_bomb:
							first_piece.make_normal_piece();
							other_piece.make_normal_piece();
							match_all_in_plus(column + direction.x, row + direction.y);


func row_to_row(first_piece, other_piece, row):
	if first_piece.is_row_bomb:
		match_all_in_row(row);
		match_and_dim(first_piece);
	if other_piece.is_row_bomb:
		match_all_in_row(row);
		match_and_dim(other_piece);

func column_to_column(first_piece, other_piece, column):
	if first_piece.is_column_bomb:
		match_all_in_column(column);
		match_and_dim(first_piece);
	if other_piece.is_column_bomb:
		match_all_in_column(column);
		match_and_dim(other_piece);
Aaaaaaaand, you'll also need this:
func find_adjacent_pieces_for_color_bombs(column, row):
	for i in range(-1, 2):
		for j in range(-1, 2):
			if is_in_grid(Vector2(column + i, row + j)):
				if all_pieces[column + i][row + j] != null and !is_piece_collectible(column + i, row + j):
					if all_pieces[column + i][row + j].is_row_bomb and !is_piece_collectible(column + i, row + j):
						for i in width:
							if all_pieces[i][row] != null and !is_piece_collectible(i, row):
								if all_pieces[i][row].is_column_bomb:
									match_all_in_column(i);
								if all_pieces[i][row].is_adjacent_bomb:
									find_adjacent_pieces(i, row);
								all_pieces[i][row].matched = true;
					if all_pieces[column + i][row + j].is_column_bomb and !is_piece_collectible(column + i, row + j):
							for i in height:
								if all_pieces[column][i] != null and !is_piece_collectible(column, i):
									if all_pieces[column][i].is_row_bomb:
										match_all_in_row(i);
									if all_pieces[column][i].is_adjacent_bomb:
										find_adjacent_pieces(column, i)
									all_pieces[column][i].matched = true;
					all_pieces[column + i][row + j].matched = true;

func match_all_in_plus(column, row):
	for i in width:
		for j in height:
			if all_pieces[column][row] != null and !is_piece_collectible(column, row):
				if all_pieces[i][j].is_column_bomb:
					match_all_in_column(i);
				if all_pieces[column][i].is_row_bomb:
					match_all_in_row(i);
				if all_pieces[i][j].is_adjacent_bomb:
					find_adjacent_pieces(i, row);
				if all_pieces[i][j].is_color_bomb:
					match_color(all_pieces[i][row].color);
				all_pieces[column][j].matched = true;
				all_pieces[i][row].matched = true;

func match_all_in_trio_plus(column, row):
	for i in range(-1, 2):
		for j in range(-1, 2):
			if all_pieces[column][row] != null and !is_piece_collectible(column, row):
				if all_pieces[i][j].is_column_bomb:
					match_all_in_column(i);
				if all_pieces[column][i].is_row_bomb:
					match_all_in_row(i);
				if all_pieces[i][j].is_adjacent_bomb:
					find_adjacent_pieces(i, row);
				if all_pieces[i][j].is_color_bomb:
					match_color(all_pieces[i][row].color);
				match_all_in_column(column + i);
				match_all_in_row(row + j);

func match_and_row_bomb(piece):
	piece.make_row_bomb();

func match_and_column_bomb(piece):
	piece.make_column_bomb();

func match_and_adjacent_bomb(piece):
	piece.make_adjacent_bomb();

func match_and_plus_bomb(piece):
	piece.make_plus_bomb();
(For some reason, I thought Taft gave us this piece of code, but if your script doesn't have it, add it in. (Do a quick Ctrl F to find it first in case you DO have it.))
func make_color_bomb(grid_position):
	if is_in_grid(grid_position):
		if all_pieces[grid_position.x][grid_position.y] != null:
			all_pieces[grid_position.x][grid_position.y].make_color_bomb();
			state = move;
And you'll also need to alter your Piece.tscn a little bit. Sorry. I couldn't figure out a NON shoe-string and bubblegum fix.
extends Node2D

export (String) var color;
export (Texture) var normal_texture;
export (Texture) var row_texture;
export (Texture) var column_texture;
export (Texture) var adjacent_texture;
export (Texture) var color_bomb_texture;
export (Texture) var plus_bomb_texture;

var is_normal_piece = false;
var is_row_bomb = false;
var is_column_bomb = false;
var is_adjacent_bomb = false;
var is_color_bomb = false;
var is_plus_bomb = false;

var move_tween;
var matched = false;

# Called when the node enters the scene tree for the first time.
func _ready():
	move_tween = get_node("move_tween");
	pass # Replace with function body.

func move(target):
	move_tween.interpolate_property(self, "position", position, target, .3, Tween.TRANS_BACK, Tween.EASE_OUT);
	move_tween.start();

func make_column_bomb():
	is_column_bomb = true;
	$Sprite.texture = column_texture;
	$Sprite.modulate = Color(1, 1, 1, 1);

func make_row_bomb():
	is_row_bomb = true;
	$Sprite.texture = row_texture;
	$Sprite.modulate = Color(1, 1, 1, 1);

func make_adjacent_bomb():
	is_adjacent_bomb = true;
	$Sprite.texture = adjacent_texture;
	$Sprite.modulate = Color(1, 1, 1, 1);

func make_color_bomb():
	is_color_bomb = true;
	$Sprite.texture = color_bomb_texture;
	$Sprite.modulate = Color(1, 1, 1, 1);
	color = "Color";

func make_plus_bomb():
	is_plus_bomb = true;
	$Sprite.texture = plus_bomb_texture;
	$Sprite.modulate = Color(1, 1, 1, 1);

func make_normal_piece():
	is_normal_piece = true;
	is_row_bomb = false;
	is_column_bomb = false;
	is_adjacent_bomb = false;
	is_color_bomb = false;
	is_plus_bomb = false;
	$Sprite.texture = normal_texture;
	$Sprite.modulate = Color(1, 1, 1, 1);

func dim():
	var sprite = get_node("Sprite")
	sprite.modulate = Color(1, 1, 1, .5);
We hit a problem with criss-crossing bombs where one bomb would set off the other, causing an undesired effect. Also, it was troublesome trying to figure out how to grab JUST the final location column and row during a move - a greater mind than mine could do it, but I couldn't. So our solution was to disolve the bombs without activating them, and activate a new bomb instead that did something different. Or... Just plain put in normal pieces and then have them do what a bomb would do anyway. (As with the trio thingy that happens if you swap an adjacent bomb with a column or row bomb and it blows up three columns and three rows.)
Also, lest it be questioned, yes, all of this code is free to use. We're watching a free-tutorial, after all, here, so it would be rude not to share things derived from it that enhance it for everyone's benefit. No permissions needed.
Sinker Targets


Whew... Who knew duplicating this would take so long? Teacher Taft was present for one of the big breakthroughs in this method, but we did work on it more after he was gone.
In the grid script, in the # Obstacle Exports we put:
export (PoolVector2Array) var bag_spaces;
In the grid script, in the func _ready we put:
spawn_bags();
In the grid script still, we made a new function (that was pretty much just a duplicated lock function).
func spawn_bags():
	if bag_spaces != null:
		for i in bag_spaces.size():
			emit_signal("make_bags", bag_spaces[i]);
Which then meant we had to go through and make a new scene of a piece that was 64 wide by 128 long. The top half of it overlaps the bottom piece of the grid (at the space where it's assigned during the export) and the bottom half of it hangs below the board. (So you might need to nudge your board up a little to use it.) Or, just... Use a different sprite with a custom size.
It also meant we needed a bag_holder node, which was legit just a copy pasta of the lock_holder with the names changed. So I'm not printing you the code for that. Don't be lazy.
Connect signals, like ya doooooo~.
Back in the grid script, down the bottom in the destroy sinker function. (Sorry if mine's named something different from everyone else's, but I'm sure you can figure it out.)
func destroy_sinker():
	for i in width:
		for j in height:
			if all_pieces[i][j] != null:
				if all_pieces[i][j].color == "non-red":
					var bag_here = false;
					for k in bag_spaces.size():
						if bag_spaces[k].x == i and bag_spaces[k].y == j:
							bag_here = true;
					if bag_here:
						all_pieces[i][j].matched = true;
						current_red_ideya -= 1;
The important thing to note with the adjustments we made to this from what was discussed in the Discord with Taft is that it no longer looks for row 0, which was previously hard coded in.
The main problem Finngia and KingCobra were having was that if they set their bottom grid row to all blank spaces, then the furthest down their sinkers could go was row 1, and they only destroy if at row 0.
By making the "bag" spaces programmable, any space on the board becomes their target space. Now, Finn argued that she doesn't want to use my bags. Okay, fair. I suggest subbing in one's own artwork. But the code still functions.
If we change the whole bag thing and instead of calling them "bag" or "bags", call them "target" or "targets", then... In the target.tscn, make the sprite 64 x 64 and completely clear. Now, when that space is placed on the board, that space becomes the target landing zone for any sinker that falls into it. So if you've got a cooky, crazy, wonky level design... then just place your target spaces on the bottom most spot that's reachable in each column. Boom. Done. Sinker disappears when it reaches the bottom of that column.
Picking up with the Is It Refactoring Or Me list
More Booster Jazz
Finn says it's not clear if you're in booster mode or not unless you actually, you know, set a booster. While in our stage of developement, I don't see it as a big issue, I can understand in a fully composed game, you wouldn't want to waste a precious booster. Can you add a temporary dim method to the booster buttons' textures while they're in the booster mode active state? I'll try to do it eventually if you don't, but it couldn't hurt to ask.
She also says, "Why do we need to get the mouse position to add_to_counter, shouldn’t the user just click the add to counter booster button and it adds to the counter and returns the game mode to move with just that one click?" (And, really, she kinda has a point. I just don't ever remember to check if it breaks anything.)
Hints - are brats
Two problems here, at least.
In my game, the hints will activate continuously - ignoring the timer, and I don't know where or how to fix it. It's driving me crazy. If I play with the one-shot thingy on the timer, it'll make the one single hint stop going off repeatedly, but instead, it'll cause this hint to flash, then that hint will flash, then another hint will flash, all over the flipping place, with no timer amount of time in between hints going off. @~@
And Finn says in her game, the hints go haywire after a while, causing her game to crash.
So... Even if these are isolated problems for the two of us, I think it's worth noting that the Hints might need a revisit, because somehow, we all broke them without trying.
Portals
You know you want them...
So to make portals for this game, in my head, we should need portal-entrance-sprites, portal-exit-sprites, a placable export (including the entry-sprite?) to say "if in this space, trigger portal transport", and a placable export (including the exit-sprite) to say, "if columns collapse, get piece from portal-a and bring it here to portal-b". Now... Whether that involves actually moving a piece (telling it your location is no longer this; now it's that) OR we do like that movie The Prestige and just... destroy the original piece and make a duplicate of it at the other location... That's a bit beyond me.
I CAST SPELL OF TAFT SUMMONING! (*rolls d20*) Make it so, Number 1! Waitaminute...
Last but Not Least
KingCobra is given to understand that Godot 3.2 won't be out until 2020 and is concerned that our ability to write our games to make in-app purchases will ALSO not be available until 2020.
I don't know how long you intend to let this series go, so we might still be getting new video updates INTO 2020, but... I can understand his antsiness, too. If the wrap up to the Godot Match 3 series comes before version 3.2, can you either rig up a system to make it work, help US rig up a system to make it work, or point us in the direction of where we should go to learn it if not from you? Again, please and thank you.
Wish List
A quick list of things I would like, so I don't forget.
- higher priority Set Amounts of Sinkers - ask
- higher priority Portals - because messing with copy grids makes my eyes spin
- higher priority Weight for pieces - because I don't understand how to do that
- higher priority Boss Battles - because
- medium priority Setting up points as goals
- medium priority pieces that fall in should be able to create bombs - either at the piece that just entered the interaction, or at a random piece in the line up
- lower priority (as far as I care) store/shop
- lower priority username input?
- lower priority friends list
- lower priority save data via ... backup, idk, password? in case files corrupt? or ... idk
